On The Bench: Pads
When your audio is overloading and there’s no pad on the preamp, what do you do? Reach for a DIY solution of course.
Text: Rob Squire
When AT’s editor Andy Stewart began leaning on me for another article recently I suspected the magazine must have been in need of some padding out [He’s kidding of course – Ed.]. Casting my mind around potential topics I came across the perfect solution – I’d write about pads! Not the sort of pads I need to strap to my swollen knees these days when I’m called on to crawl underneath consoles, but rather the sort that typically lurk behind switches on microphones and preamps.
The pad is one of the most obvious of audio control functions: flick the switch and the signal level drops by the prescribed amount; flick it again and the signal is restored. Here we’ll explore why we need them, how to design them and importantly how you can build your own.
CUSTOM PADS
Last month I had a client contact me who was in need of some custom pads for teaming with his microphone selection and API preamps. His quandary was understandable. While recording drums at the minimum gain settings he’d found the API preamps still often yielded levels that were too hot for both the preamps themselves and his downstream recording medium. The signals were either clipping outright or hovering too close to 0dBFS for his engineering comfort. The preamps did offer a 20dB pad switch, and sure enough, engaging these dropped the signals right down to levels that were safely remote from those threatening clips. Indeed, the gain on the preamps could now be increased from their minimum setting. Perfect solution? Not quite!
He’d also been paying sufficient attention to notice that while the built-in pads sorted out the level issues they also did something to the sonics that wasn’t to his liking. As we all tend to do these days he immediately hopped online and perused the big name forums for an explanation to his experience. As is also often the case, by the time he called over to the workshop he was armed with pages of confusing and inaccurate e-drivel about pads, preamps and sonics.
SO WHAT GIVES?
Let’s break an API-style preamp down into two essential parts, noting also that this exploration applies to all input transformer-based preamps.
In a preamp of this style, the first thing the signal hits is the transformer. This part gives some voltage gain into the second part – the amplifier stage comprised of electronic components. While the transformer can’t provide any control over the signal level passing through it, the amplifier electronics following the transformer is intrinsically linked to the front panel gain control, which most certainly does vary the level passing through it. Regardless of the position of the front panel gain control – indeed regardless of anything to do with the amplifier stage – the transformer can be overloaded with a sufficiently hot signal directly from the microphone, which by the way, isn’t always a bad thing! A transformer passing a very hot signal can sometimes yield a euphonically desirable distortion, a topic explored in detail way back in Issue 55. A problem arises, however, when this hot signal then hits the amplifying electronics, which even at its minimum gain setting still overloads – and this overloaded signal doesn’t sound nice.
So, there’s a dilemma: when the pad in the preamp (which is placed before the transformer) attenuates the signal by 20dB, it solves the problem of overloading the electronics, but also drops the signal level through the transformer, thus significantly reducing its euphonic contribution to the overall sound. This was my client’s basic problem.
To solve the problem what we needed was a custom pad that dropped the signal by around only 5dB, rather than 20. Placing this in-line between the mic and the preamp would drop the level sufficiently to overcome the overloading of the electronics, while simultaneously keeping the signal hot enough through the transformer to maintain some of its desirable distortion.
There are innumerable preamps out there that produce a nasty overload when they’re hit with a very hot signal, even at their minimum gain setting. This is why most manufacturers – though strangely not all – provide a pad to soften the blow to the preamp stage. To manage these padless preamp varieties in particular, having some custom-built external pads in your back pocket can be a real lifesaver for an engineer.


NOT AN iPAD
In essence a pad is simply a string of selected value resistors that provide a desired attenuation. There are a bunch of different ways of connecting resistors, of course, with each design meeting differing objectives and generating different outcomes.
Back in the day when professional audio systems were based around 600Ω input and output impedances, pads were designed to achieve a particular attenuation while consistently maintaining this 600Ω impedance. The two typical pads that met this objective were called ‘T’ pads or ‘Pi’ pads, with both having balanced and unbalanced versions. Calculation of the actual resistors required in these sorts of pads was (and remains) complex, where solving the twin goals of impedance and attenuation sometimes yields physically impossible resistor values.
Fortunately, most audio equipment today doesn’t provide – nor require – matched 600Ω input and output impedances and so pads on modern audio systems can be of a simpler type called ‘L’ pads (for unbalanced signals) or ‘U’ pads (for balanced signals). While we still need to consider the impedance of the pad and the devices connected to it, we’re free of the strict 600Ω requirement.
MICROPHONE PADS
Microphones typically have an output impedance somewhere around 200Ω while most preamps have an impedance of around 2000Ω. Even though the exact values found in the variety of real-world products vary around these figures, they’re sufficient to get us into the ballpark to begin designing a microphone pad.

THE U-PAD
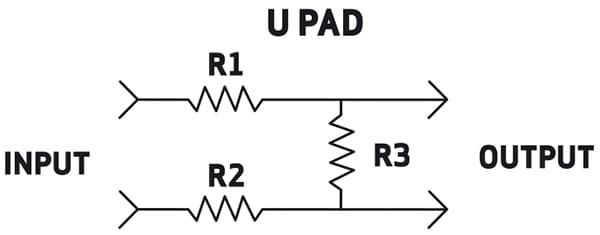
In the U-pad illustration above, the value of R1 is always the same value as R2, the rule being that larger values of R1 and R2 and/or smaller values of R3 increase the amount of attenuation the pad provides. While there’s an infinite combination of resistor values that can meet a given attenuation we still want to keep the input and output impedance of the pad in the sensible range, and this constrains our choices.
Here’s a table of attenuation and suggested resistor values:

Note that the exact amount of attenuation will vary with the input impedance of the microphone preamp used and that some old-school preamps with lower input impedances will cause a greater amount of attenuation to occur than the table indicates. Some of the new-school preamps with a variable input impedance – which seems to be becoming the current fad – will actually create an amount of attenuation that varies with the input impedance dialed up. This could be a cool side effect of the design… or a pain in arse, depending on your circumstances.
PUTTING IT TOGETHER
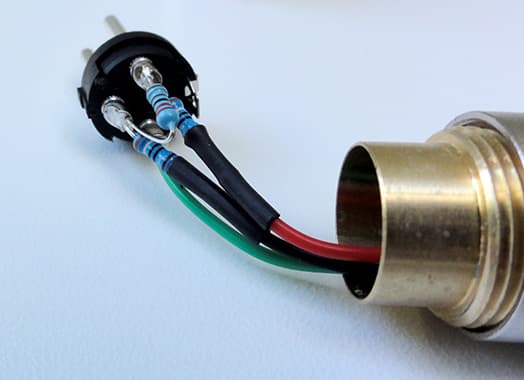
There are a few manufacturers of XLR barrels around but one that’s particularly neat is the Neutrik barrel system. This adaptor fully disassembles into separate parts that screw back together to provide a robust XLR-to-XLR connector with sufficient room inside the barrel to incorporate the pad components.
In the picture above, the resistors are mounted directly off the XLR solder lugs with R3 soldered between Pins 2 and 3 of the male XLR, while R1 and R2 fly off Pins 2 and 3, and connect to their respective pins on the female XLR at the other end. Don’t forget to run a wire from Pin 1 of the male XLR to Pin 1 of the female XLR to maintain the ground connection.
As the barrel parts screw together it’s also a good idea to gently twist up the wires in the reverse direction a few turns before screwing the sections together. This enables the wires to unwind and avoid being over stretched or broken at the solder joints as the connector is assembled. Placing heatshink over the joints where the wires join the resistors is also a good idea.
LINE ’EM UP
This is all well and good for microphones of course, but what about line level signals? I’ve built a number of fixed pads for studios that required one set of line outputs to be reined in to match other sources. Here the same U-pad as for microphones will work but the overall impedance of the pad has been increased to suit broader range line-level sources, where there’s greater variation in the load different devices can drive without distortion.


THE VARIABLE PAD
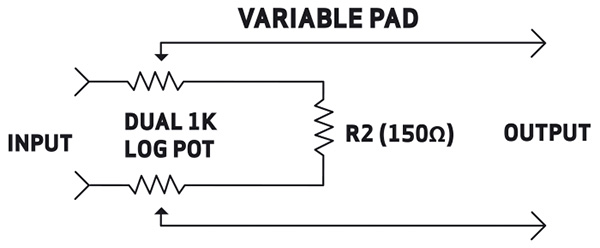
A fully variable pad can transform the fixed pad into a new tool of exploration, useful not only between microphones and preamps but also across line outputs. This is particularly the case with some tube equipment that overloads gracefully, but while pushing the unit with hot level yields the sound you’re seeking, the output level becomes too unwieldy to deal with. Here the pad can be placed in between the output of the device you’re plying with hot levels and the next device in the chain. While there’s some compromise with the impedances involved, the solution in the above circuit works fine in 99% of situations. Here a dual-gang 1kΩ log pot is wired as a variable balanced attenuator with R2 setting the maximum amount of attenuation. With R2 being a 150Ω resistor the attenuation ranges from 0 to 25dB.
BUT WAIT, THERE’S MORE
While we still have these XLR barrel adapters open in our hands there are other uses for them well worth considering. Do you recall my reminder to join Pins 1 together in the XLR adapter of the microphone pad? If not, you may have already gone ahead and made it and forgotten to make this connection. No stress, inadvertently you’ve just made another handy tool: a ground-lift connector – where Pins 2 and 3 connect straight through but Pin 1 is left disconnected. When hunting down a ground loop hum, having one of these in your back pocket can be pretty handy. A phase reverse adapter can likewise be helpful, where the wiring between Pins 2 and 3 is swapped over from the male to the female XLR. I carry both of these types of adapters in my troubleshooting tool kit along with a 40dB pad, which allows me to take a line level signal and inject it into a preamp at a typical microphone input level. A word of warning though: if you do decide to wire these alternatives up, make damn sure you mark them clearly ‘Earth lifted!’ and ‘Phase reversed!’.
SHAPING YOUR SOUND
My dictionary gives a number of meanings for the word ‘pad’, but one I particularly like is: “a material used to protect something or give it shape, to clean or polish articles” [kind of like an editor – Ed.]. Armed with a range of pads of differing attenuations you can certainly shape, clean and polish your audio.


RESPONSES