Mixing with Parallel Compression
Make friends with parallel compression and you have an enormously powerful tool to add impact and intensity to your mixes without the artefacts associated with heavy compression. Andy Stewart enters a parallel universe.
The compressor is one of the most widely used and versatile tools in an audio engineer’s arsenal, yet for a variety of reasons it’s also possibly the most commonly misunderstood, abused, feared and contentious. As with any audio production tool, compressors don’t come with a rulebook proclaiming one technique the winner over all others; one sound ‘better’ than the rest. The sound compressors impart on an audio signal is open to infinite interpretation, and their benefits are highly subjective and personal. What constitutes ‘too much’ compression to one person may not be enough to another, and in the end, it’s all a matter of taste and musical preference that contributes to the infinite variety of audio production. What is important to know is how to achieve the sounds you want with compression techniques that create the sonic outcomes you’re after.
Virtually everyone interested in recording music, mixing live or broadcasting audio signals over the airwaves uses a compressor at some point, and consequently there will inevitably be those who use them well and those who use them badly. At these times, concepts like ‘subjectivity’ and ‘personal preference’ can often become a euphemism for incompetence, argued by those who would do well to simply know more about what’s involved in using compressors more skilfully. But regardless of whether you’re fully conversant with compressors or twiddling knobs and hoping for the best, compression is ultimately your ally, and being able to produce the sounds that you or your clients demand must therefore be the ultimate goal. Learning how to use compressors well should be a high priority for any engineer. Once you master them, the types of compressors and the compression settings you use throughout a project will be perfectly ‘designed’ by you, to achieve the sound you want, rather than some other poorly produced sound you defend on ‘subjective’ grounds to deflect criticism away from your lack of skill in using them.
One of the most crucial places where compression is applied to audio is during the mixing process. Whether you’re mixing an album, a single or a live gig, similar principles apply; the basic idea is to produce a sound that’s representative of the performance, aurally appealing to the listener and dynamic in a way that’s appropriate to the limitations of the playback medium. This is a tricky concept, however, because sometimes a mix – particularly if it’s a commercial single – will be played on a variety of disparate systems: the car stereo, the expensive home setup, an MP3 player through cheap headphones or even a mobile phone, and the dynamic range of all these replay environments has to be taken into account. This doesn’t mean to say that your mixes must be compressed to within an inch of their lives to accommodate the clock radio at the expense of their fidelity through a quality home stereo, it simply means the different playback formats need to be considered to determine how much dynamic range your mix can afford to project. Put simply, it’s important by the mixdown stage (and preferably much earlier) to be well aware of where you anticipate your mix being played, and knowing this will vastly improve the final outcome.
WORKING IN PARALLEL
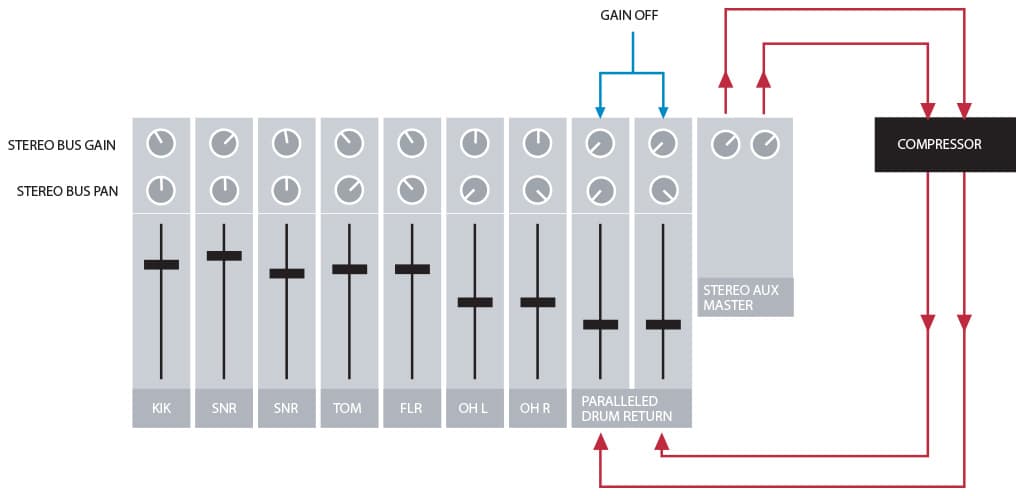
One technique frequently used during the mixing process is what’s loosely termed ‘parallel compression’. The use of parallel compression is one of the most powerful and widely practised techniques in audio. In a nutshell, it’s the combining of an uncompressed (or lightly compressed) signal with a more heavily compressed version of itself, to provide an increase in average level of that signal without the resultant compression artefacts. By creating a second identical signal – either via an auxiliary send, bus or group output on a console – any sound (or group of sounds) can be fed into a compressor and treated with ‘parallel’ compression, meaning that the compressor is treating a ‘duplicate’ of the signal, rather than the signal itself, which is then fed back into the console on a separate fader (or faders) [See diagram opposite]. This technique can be used to significantly raise low-level signals without necessarily compromising the sonic integrity of that signal’s transient peaks. Although compression artefacts are sometimes the crucial ingredients of an interesting sound, there are many circumstances where ‘invisible’ compression is best, and parallel compression can be the means to help you achieve this.
In many respects, parallel compression works a sound from the ground up, rather than from the top down. To express this idea metaphorically, it’s like raising the ‘valley floor’ of a mountain range without destroying the mountain ‘peaks’ in the process. Of all the components of a dynamic sound it’s these ‘peaks’ that are the most susceptible to damage and/or changes to the waveform’s envelope, especially if a compressor is either poorly designed or inappropriately set up. Because the peaks of the sound travelling through a compressor are typically above the threshold (the point above which the compressor acts to reduce the input gain of an incoming signal) a compressor will act quickly (if the attack time is fast) to reduce them, or slowly to allow them to pass wholly or partially through, depending on the compression settings. Regardless, once the compressor is triggered into action, it modifies the envelope of the sound, and not always in ways that are appropriate or musical. Often these compression artefacts are deemed the lesser of two evils, preferable to the sound remaining overly dynamic.
Yet more often than not, a compressor’s role is ultimately about lifting the low-level ‘valley floor’ signals up, by reducing the dynamic range as invisibly as possible and increasing the makeup gain to compensate for the reduction in our peak volume, and this is where parallel compression comes into play. Rather than working directly on the mountain peaks by pushing them down and damaging their sonic integrity in the process, parallel compression effectively leaves these peaks intact, because it’s not working directly on the main signal, but rather, a subsidiary of it. This allows the transient peaks of any sound to be left relatively intact, while at the same time lifting the low-level components of that sound up to support it – kind of like having your cake and eating it too.

A PRACTICAL EXAMPLE
By way of example, let’s say we’re in the middle of a mix and we decide our drums need to be more powerful. For whatever reason – whether they be sampled, triggered or recorded in a studio – the drums are currently a little lacklustre, even after we’ve compressed them as much as we dare. We need more power from the drumkit but we’re instinctively aware that driving the drums any harder into the compressors will only serve to destroy the integrity and impact of the recorded sounds, making them seem weaker and duller, not stronger. Whether our need for this extra power is because our drums are driving twice as many recorded elements than was originally anticipated, or because the drumkit itself, or the room around it, was inadequate, the problem of how to make the drums possess a more aggressive intent than was anticipated during the recording phase can now be greatly improved with parallel compression.
Using this technique we can basically leave our ‘good, albeit somewhat lacklustre’ drums (that we’ve already roughly mixed to our reasonable satisfaction) alone at this point. To rev them up a bit using parallel compression we must now create a new mix of the kit elements that will best provide us with the extra ‘oomph’ that’s missing so far. If you’re using an analogue console or DAW, the easiest way to do this is with an auxiliary send, bus or group; something that can create a new alternate ‘version’ of our drumkit which leaves our current drum mix alone. Assuming we want to retain the panning integrity of the kit, a group send might be the best option, as it will retain the panning features of the individual channels; alternatively a stereo auxiliary or bus will require you to re-establish pan settings. A word of warning: if your new drum mix is being created digitally or in combination with a digital workstation, it’s crucial that the returning signal from the compressor is phase coherent with the original drum mix, otherwise the combination of the two will almost certainly sound horrible. (See the ‘Phase Alignment’ box item opposite for more details.)
If your drums ultimately need to be splashier and roomier than the main drum mix you already have up on the board, your newly-bussed drums might include more overheads and room mics. Conversely, if you need more front-end power, your bussed mix might be made up of a simple combination of the close mics. Assuming this auxiliary mix is a stereo image, this signal is now fed into a stereo compressor, compressed more aggressively than you were prepared to before, and sent back into the console on two new faders. Now you have the original drum sound working in parallel with a whole new ‘power-crazed’ version of the exact same performance right alongside it. You can now mix the level of the newly acquired stereo drum channels to taste, adjusting the drumkit’s send balance until you’re satisfied that the extra power your compressor is supplying has the right mix of close and/or ambient mics.

HIGHS & LOWS OF PARALLEL COMPRESSION
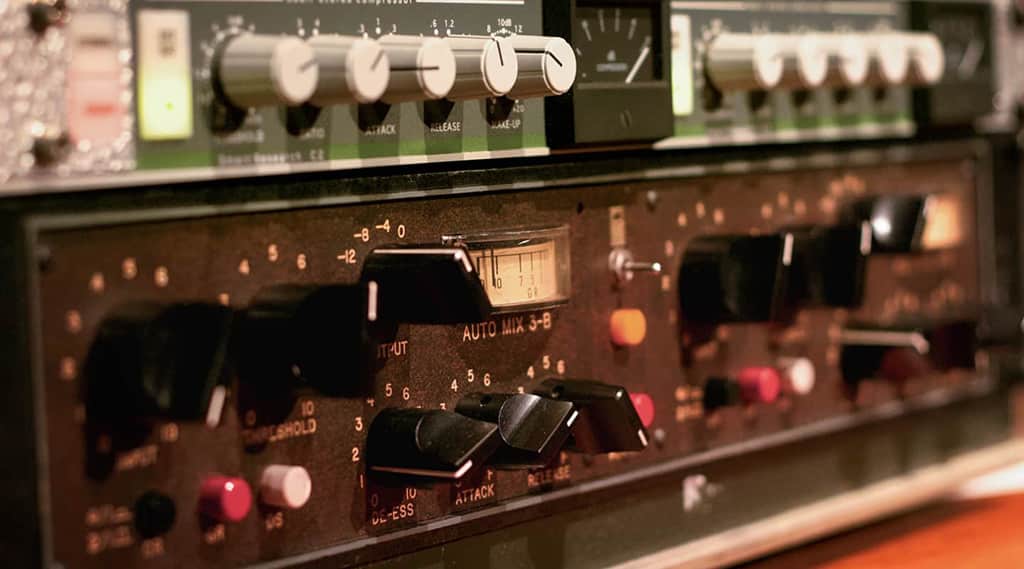
Because they’re more heavily compressed than the other drum channels, the parallel drum mix will support the overall drum sound by underpinning it, raising its average level and making it more powerful and exciting. In this circumstance, I often use an Al Smart C2 with the Crush button switched in, to provide the kit with ‘attitude’. Parallel compression may be obvious in the mix once you know where to look, but the benefit is that it appears to be pushing from the ground up, providing the drummer with more determination and force, rather than the instrument with more compression. This is what makes it ‘invisible’ – the compressor appears to be acting on the player’s intent rather than the instrument itself.
Obviously our ‘parallel mix’ of drums that’s feeding into the compressor is itself being subjectively ‘damaged’ by our aggressive compression setting; the mountain peaks are copping a battering in order to narrow the dynamic range and ‘raise the valley floor’. But because this stereo image is only supporting our overall kit sound, rather than leading the charge, the integrity of the drumkit’s transients remains intact overall, thanks to the dominant volume and dynamic integrity of the other drum channels that have far less aggressive compression settings – provided of course that our new bombastic drum channels aren’t turned up too loud. With parallel compression established on the drumkit, we now have control over the power and aggression of the kit on faders. This is the whole conceptual basis of the parallel compression technique. Things like snares will have more sustain and clarity in a way that reaching for EQ or a short reverb can never hope to achieve. Need more snares in your snare, but find the sound gets peaky and small if you try and emphasise those frequencies with EQ? Parallel compression to the rescue!
THINGS TO WATCH OUT FOR
Apart from phase integrity, which can wreak havoc with our sound if digital latency is generated during the creation of our dedicated parallel mix source, the other thing you must be careful to avoid is allowing too much bottom end into the ‘parallel’ channels. Excessive use of parallel compression during mixdown can sometimes lead to a build up of bottom end in your mix. If this happens, try using a roll-off either before or after the compressor, either by inserting an EQ in between the auxiliary send and the compressor, or by using hi-pass filters that may be available on the return channels on the console.
The other thing to be careful of is left/right balance, which can cause the stereo image to be pulled left or right if the heavily-compressed version of our drumkit (to continue the example) is lopsided. If the main individual snare channel is panned dead centre, but our aggressive stereo mix of the kit is biased to the left by accident, as the snare decays it will pull to the left, creating instability in the stereo image.
One extra advantage of parallel compression is that the technique is handy if your compressors aren’t the greatest, because their artefacts can be submerged in the mix, rather than up front and exposed. That compressor you have in your rack – you know the one that never gets used but hasn’t been sold because it’s now worth 50 bucks? It always reacts ‘badly’ to transient instruments and you’re reluctant to use it on all but the gentlest setting because its artefacts are so obvious in a mix. Well, you might find that this compressor is perfect when used in parallel. When its characteristic sound is mixed back into the console on separate faders, it may (ironically) turn out to be just the sound you’re looking for!
Parallel compression can work subtly or obviously on just about anything in a mix. In instances where true compression ‘transparency’ is of paramount concern, like vocals (though this is not always the case) it can work wonders, provided you choose a compressor that has a flavour sympathetic to your cause. Depending on what you decide – you might want a vocal to sound fuller and rounder, an electric guitar to have more bite or a piano less dynamics but the same tonality – your compressor of choice should be based on this requisite flavour. But of course, given there are no ‘rules’ about what sounds good or bad, you can determine for yourself which compressor to use.
Things like snares will have more sustain and clarity in a way that reaching for EQ or a short reverb can never hope to achieve

SPIN-OFF EFFECTS
The benefit of splitting the signal into two (or sometimes three) parts to facilitate the process can also have other spin-off benefits. For instance, a vocal with parallel compression can often allow the send to your vocal reverb to be more controlled. By sending the more highly compressed (or de-essed) vocal to the reverb unit via an auxiliary, the subsequent effect will be less dynamic than the overall vocal performance, which can work well if you don’t want too many sibilant moments triggering the reverb, causing it to fizz. Of course, you could always split and/or duplicate the signal in your DAW and send a duller version of the vocal to the reverb unit, or simply EQ the reverb, but the effect on the reverb’s tone in using either of these approaches is quite different. Conversely, you might want the vocal’s effects to be more dynamic than the overall performance, to exaggerate the perception of space relative to the dynamics of the vocal – either way, with two ‘versions’ of the one vocal, you now have the choice.
PARALLEL UNIVERSE
Whenever I mix, whether it’s in the digital domain, the analogue domain, or with one foot in both camps, parallel compression is almost always part of my mixing palette. I use it to breathe life into dull performances, add ‘attitude’ and impact to sounds, and create in-your-face compression without turning the audio signal to dust. Once you begin to explore this technique, the doors into a wider realm of compression will swing open. Things you never thought possible will suddenly be achievable, and compression will become something you no longer fear. As with any newly discovered mixing technique the initial excitement and focus on it may cause you to over-use it. That’s cool – the best way to understand what anything does is often to push it too far and then back away until the right balance is achieved. Always remember though, mixing is about balance regardless of what it is you’re working on, and the best mix engineers are always conscious of this fundamental tenet. If you’ve never used parallel compression before, get amongst it and see what it can do for you.


RESPONSES