
Mixing With Headphones 4
In the fourth instalment of this six-part series, Greg Simmons distils seven years of mixing without big monitors into some useful tips for mixing on headphones – starting with equalisation.
In the previous instalment we discussed useful tools for mixing with headphones, with a focus on identifying and replicating the problems that only occur when mixing with speakers. Why replicate those problems? Because compensating for them ultimately gives our speaker mixes more resilience (i.e. they translate better through different playback systems), and we want to build that same resilience into our headphone mixes.
We also exposed the oft-repeated ‘just trust your ears’ advice for the flexing nonsense it is. Any question that triggers this unhelpful response is obviously coming from someone who cannot or does not know how to ‘trust their ears’, either through inexperience or lack of facilities. Brushing their question off with ‘just trust your ears’ is pro-level masturbation at its best. The ‘trust your ears’ advice is especially invalid when mixing with headphones. In that situation we cannot ‘trust our ears’ because, as we’ve established in previous instalments, headphones don’t give our ears all of the information needed to build resilience into our headphone mixes.

The previous instalment ended with a ‘Mixing With Headphones’ session template, set up and ready for mixing. In this instalment we’ll start putting that template into practice using the EQ tools it contains; in the fifth instalment we’ll look at dynamic processing (compression and limiting), and in the sixth and final instalment we’ll look at spatial processing (reverberation, delays, etc.). But first a word about ‘visceral impact’ as defined in the second instalment of this series, and some basic mixing rules to get your mix started…
Visceral Elusion
We know that with headphone monitoring/mixing there is no room acoustic, no interaural crosstalk, and no visceral impact to add an enhanced (and perhaps exaggerated) sense of excitement. In the second and third instalments of this series we discussed ways of working around the frequency response and spatial issues, but the lack of visceral impact is a trap we need to be constantly aware of – especially when first transitioning from speaker mixing to headphone mixing.
A good pair of headphones can effortlessly reproduce the accurate and extended low frequency response that acousticians and studio owners dream of achieving with big monitors installed in expertly designed rooms and costing vast sums of money. However, when mixing with headphones we have to remember that those low frequencies are being reproduced directly into our ears via acoustic pressure coupling – which means we do not experience them viscerally (i.e. we do not feel them with our internal organs aka our viscera) as we do when listening through big monitors. There is no visceral impact, which means we must be very careful about how much low frequency energy we put into our mixes. Increasing the low frequencies until we can feel them is not a good idea when mixing with headphones…

This is where the musical reference track and the spectrum analyser in our ‘Mixing With Headphones’ template are particularly valuable. If the low frequencies heard in our mix are pumping 10 times harder than the low frequencies heard in our reference track and seen on the spectrum analyser, they’re probably not right. It might be tempting to succumb to premature congratulation and declare that our mix is better than the reference because it pumps harder, but it is almost certainly wrong. That’s the point of using a carefully chosen reference track that represents the sonic aesthetic we’re aiming for: if our mix strays too far from the reference in terms of balance, tonality and spatiality then it is probably wrong and we need to rein it in before it costs us more time and/or money in re-mixing and mastering.
How do we avoid such problems when mixing with headphones? Read on…
BASIC RULES FOR HEADPHONE MIXING
The following is a methodical approach to mixing with headphones based on prioritising each sound’s role within the mix, introducing the individual sounds to the mix in order of priority, and routinely checking the affect that each newly introduced sound is having on the evolving mix by using the tools described earlier: mono switch, goniometer, spectrum analyser with 6dB guide, and a small pair of desktop monitors. This methodical approach allows us to catch problems as they occur, before they’re built into our mix and are harder to undo. The intention is to create a mix that, tonally at least, should only require five minutes of mastering to be considered sonically acceptable.
Note that the methodical approach described here is not suitable for a mix that needs to be pulled together in a hurry; for example, mixing a live gig that has to start without a soundcheck or rehearsal, or dealing with advertising agency clients who don’t understand why a 30 second jingle takes more than 30 seconds to record and mix. In those situations ‘massage mixing’ is more appropriate, i.e. pushing all the faders up to about -3dB, getting the mix together roughly with faders and panning, focus on keeping the most important sounds in the mix clearly audible, and continue refining the mix with each pass until the gig is finished or the session time runs out. In these situations, Michael Stavrou’s sculpting analogy [as explained in his book ‘Mixing With Your Mind’] is very applicable when he advises us to “start rough and work smooth”. Get the basic shape of the mix in place before smoothing out the little details, because nobody cares about the perfectly polished snare sound if they can’t hear the vocal.
Establishing The Foundation
For the strategic and methodical approach described here, start by establishing the foundation sounds that the mix must be built around. For most forms of popular music those foundation sounds are the kick, the snare, the bass and the vocal. Each of the foundation sounds should have what Sherman Keene [author of ‘Practical Techniques for the Recording Engineer’] refers to as ‘equal authority’ in the mix – meaning each foundation sound should have the appropriate ‘impact’ on the listener when we switch between them one at a time, and they should work together as a cohesive musical whole rather than one sound dominating the others. A solid stomp on the kick pedal should hit us with the same impact as a solid hit on the snare, a firm pluck of the bass guitar, and a full-chested line from the vocalist. Those moments should feel like they hit us with the same impact, and they should feel like they belong together in the same performance. That feeling is harder to sense without the visceral impact of speakers, but with a little practice and cross-referencing against our reference track we can get there.
This methodical approach allows us to catch problems as they occur…
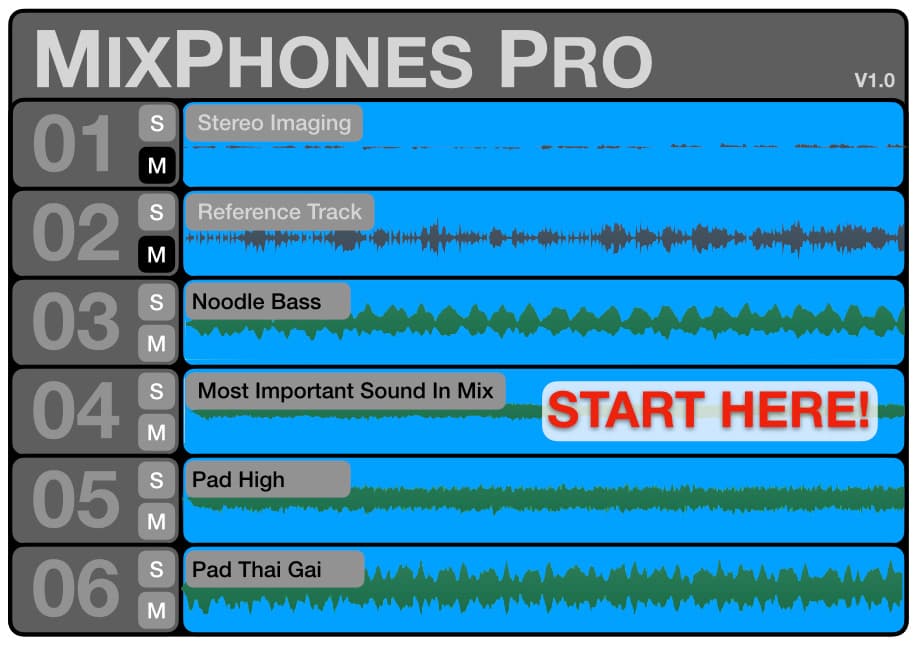
Start with the most important sound in the foundation, and get that right to begin with. For most forms of popular music that will be the vocal, so start the mix with the vocal only and get it sounding as good as possible on its own, where it is not competing with any other sound sources. You may need to add one or two other tracks to the monitoring – one for timing and one for tuning – to provide a musical context for editing and autotuning but don’t spend any time on those tracks yet. Focus on getting the vocal’s EQ and compression appropriate for the performance and the genre. Aim to create a vocal track that can carry the song on its own without any musical backing. Create different effects and processing for different parts of the vocal performance to suit different moods or moments within the music – for example, changing reverberation and delay times between verses and choruses, using delays or echoes to repeat catch lines or hooks, and similar. Use basic automation to orchestrate those effects, bringing them in and out of the mix when required as shown below. Note that placing the mutes before the effects simplifies timing the mute automation moves and also allows each effect (delay, reverb, etc.) to play itself out appropriately instead ending abruptly halfway through – the classic rookie error.

Once we have the vocal (or whatever is the most important sound in the mix) ready, check it in mono, check it on the goniometer and check it on the desktop monitors to make sure that the stereo effects and processors are behaving themselves. Cross reference it with the reference track in the Mixing With Headphones template to make sure it is sounding appropriate for the genre.
Introduce the other foundation sounds one at a time; in this example they will be the kick, the snare and the bass. Use EQ, compression and spatial effects (reverberation, delay, etc.) to get each of these sounds working together in the same tonal perspective and dynamic perspective as the vocal, and in the desired spatial perspective against each other and against the vocal. Toggle each plug-in and effect off and on repeatedly to make sure it is making a positive difference. If not, fix it or remove it because processors that are not making a positive difference are like vloggers at a car crash: they’re ultimately part of the problem. Check each foundation sound and its processing in mono, check it on the goniometer and check it on the desktop monitors to make sure that its stereo effects and processors are behaving themselves.
With all of the foundation sounds in place we may need to tweak the levels of any spatial effects on the vocal that have become perceived differently after introducing the other foundation sounds.
Orchestrate the effects for the foundation sounds (as described above for the vocal) to help each sound stand out when it’s supposed to stand out and stand back when it’s supposed to stand back, thereby enhancing its ability to serve the music.
Always consider the impact each newly-introduced sound is having on the clarity and intelligibility of the existing sounds in the mix and, particularly, its impact on the most important sound in the mix – which in this example is the vocal. We should not modify the vocal to compete with the other sounds, rather, we should modify the other sounds to fit around or alongside the vocal. After all, in this example the vocal is the most important sound in the mix and we had it sounding right on its own to begin with. If adding another sound to the mix affects the sound of the vocal (or whatever the most important sound is), we need to make changes to the level, tonality and spatiality of the added sound. That is why we prioritised the sounds to begin with: to make sure the most important sounds have the least tonal, dynamic and spatial compromises, and therefore have the most room to move and feature in the mix.
Note that the goal here is to fit the other sounds around and alongside the vocal, not simply under the vocal. Putting foundation sounds under the vocal is the first step towards creating a karaoke mix or a layer cake mix; more about those in the last instalment of this series…
After introducing each new foundation sound to the mix be sure to check it in mono, check it on the goniometer (as described in the previous instalment) and check it on the desktop monitors to make sure it is not misbehaving in ways we cannot identify in headphones but will become apparent if heard through speakers.
With the foundation mix done, save a copy that can be returned to in case things spiral out of control. Thank me later when/if that happens…
Beyond The Foundation
Introduce the other sounds one at a time, weaving each of them among and around the foundation sounds while ensuring all sounds remain in the desired tonal perspective, dynamic perspective and spatial perspective with each other. The following text describes strategies for achieving tonal perspective; strategies for achieving dynamic perspective and spatial perspective are discussed in the forthcoming instalments.
Every new sound introduced to the mix has the potential to change our perception of the existing sounds in the mix, so check for this and process accordingly without messing with the foundation sounds. Pay careful attention to how each new sound impacts the audibility of spatial effects (reverbs, delays, etc.) that have been applied to existing sounds, and adjust as necessary.
Loud Enough vs Clear Enough
When balancing sounds together in the mix, always be aware of the difference between “not loud enough” and “not clear enough”. Novice engineers assume that if they cannot hear something properly it is not loud enough and will therefore reach for the fader. More experienced sound engineers know that often the sound described as “not loud enough” is in fact loud enough but is not clear enough due to some other issue with how it fits into the mix (e.g. its tonality, its dynamics or its spatial properties). And in some cases we realise that the sound deemed not loud enough is actually being buried or masked by another sound that is too loud in the mix and needs to be fixed.
…fit the other sounds around and alongside the vocal, not simply under it…

Bring each sound up to the level it feels like it is supposed to be at from a performance point of view, regardless of how clear it is. We can determine if its level is right by soloing it against other sounds that are meant to have similar authority in the mix. If the sound is at the right performance level when solo’d against sounds of similar authority but is hard to hear properly in the mix, the problem is not the sound’s fader level but rather its clarity and/or separation within the mix.
In most cases this means the sound’s overall level is correct but some parts of its frequency spectrum are either not loud enough or are too loud, and we need to use EQ to boost or cut just those parts of the sound’s frequency spectrum to make it clear enough and bring it into the correct tonal perspective for the mix. We’ll discuss this process later in this instalment.
If it is hard to find the right level for a sound that gets too loud at some times and too soft at other times, it suggests that sound is probably not in the same dynamic perspective as the other sounds and will require careful compression to rein it in. (See ‘Dynamics Processing’ in the next instalment.) Sometimes a sound is in the correct tonal perspective and dynamic perspective for the mix but gets easily lost behind the other sounds, or continually dominates them, due to having an incorrect spatial perspective (e.g. too much reverb). We use spatial processing to create, increase or decrease the sound’s spatial properties and thereby assist with separation (See ‘Spatial Processing’ in the sixth instalment of this series.)
It’s also possible that the problem is unsolvable at the mixing level due to ridiculous compositional ideas that have since become audio engineering problems. For the remainder of this series let’s remove that variable by assuming we’re working with professional composers who know how to build musical clarity and separation into their compositions.
To solve these ‘loud enough but not clear enough’ problems we use tonal processing to adjust the balance of individual frequencies within a sound, dynamic processing to solve problems with sounds that alternate between too loud and too soft, and spatial effects to provide separation from competing sounds. Let’s start with tonal processing, or, as it is generally referred to, ‘EQ’ and ‘filtering’…
EQUALISATION & FILTERING
The use of equalisation and filtering serves three purposes in a mix: correcting sounds, enhancing sounds, and integrating sounds. In our ‘Mixing With Headphones’ template described in the previous instalment we added three EQ plug-ins to each channel strip. Why three?
To reinforce the methodical approach required when transitioning from speaker mixing to headphone mixing. We’re going to use a separate plug-in for each EQ purpose in the mix – corrective, enhancing and integrating – and we’re going to apply them in a methodical manner. We’ll start by correcting problems in the raw sound, then enhancing the corrected sound to turn it into the finished sound we’d like to hear in the mix, and finally we’ll make small tonal adjustments to integrate the finished sound into the mix’s tonal perspective.
In many cases we can achieve all of these EQ purposes with a single EQ plug-in, but for now it is useful to be keep each one separated so it has a single clearly-defined role. This allows us to tweak any of the three EQ plug-ins without affecting the settings of the others. To do this we set up a Mixing With Headphones template with a corrective EQ, an enhancing EQ and an integrating EQ as sown below. Here’s what they’re for…

Corrective EQ
This is used to fix fundamental problems in individual sounds and clean them up before putting them in the mix, which means we should choose a clean EQ plug-in that is not designed to impart any tonality or character of its own into the sound. The emphasis here is to use something capable rather than euphonic. A six-band fully parametric EQ with at least ±12dB of boost/cut, along with high and low pass filtering and the option to switch the lowest and highest bands to shelving, is a good choice.
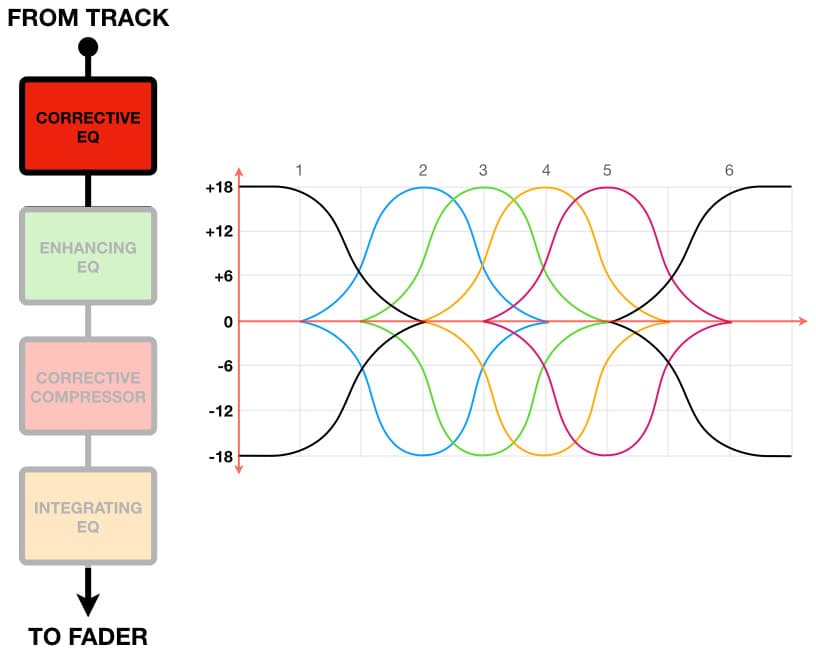
Corrective EQ is used to make an excessively dull sound brighter or to make an excessively bright sound duller, to fix sounds that have too much or too little midrange, and to fix sounds that have too much or too little low frequency energy. It is also used to remove or reduce the audibility of any unwanted elements within the sound such as low frequency rumble (high pass filter aka low cut filter, low frequency shelving cuts), hiss and noise (low pass filter aka high cut filter, high frequency shelving cuts), and unwanted ringing and resonances (notch filters, dips).
The goal of corrective EQ is to create objectively good sounds. What is an objectively good sound? It’s a sound that does not contain any objectively bad sounds, of course. It is hard to define what sounds are objectively ‘good’, but it’s easy to define what sounds are objectively ‘bad’.
Objectively ‘bad’ sounds are resonances and rings, low frequency booms and rumbles, unwanted performance noises and sounds, hiss and noise, and similar unmusical and/or distracting elements that don’t belong in the sound as we intend to use it.
One of the most common applications of corrective EQ is removing unwanted low frequency energy. Most sounds contain unwanted low frequency energy below the fundamental frequency of the lowest musical note in the performance. It may not seem like much on any individual track but the unwanted low frequency content on each track accumulates throughout the mix, with two results. Firstly, it reduces the impact and clarity of kick drums, bass lines, low frequency drones and other sounds that are legitimately occupying that part of the frequency spectrum. Secondly, most monitoring systems are not capable of reproducing this unwanted low frequency information reliably (particularly below 70Hz), and forcing them to reproduce it affects their ability to reproduce other frequencies that are within their range – which thereby affects their ability to reproduce the mix. It’s like forcing one horse to pull a cart that requires two horses.
Strategically removing unwanted low frequency information from individual sounds brings clarity and definition to our mixes while also allowing a broader range of monitoring systems to reproduce our mixes properly. With these benefits in mind, it is always worthwhile starting any EQ process by viewing the sound on the spectrum analyser (built into the Mixing With Headphones template) and looking for activity in the very low frequencies that has no musical value. This will be low frequency activity that remains visible, whether audible or not, and can be seen bobbing up and down at the far left side of the spectrum analyser regardless of what musical parts are being played. Removing or reducing this unwanted low frequency information with a carefully-tuned high pass filter or low frequency shelving EQ (in either case pay attention to the cut-off frequency and the slope) will clean up the individual sounds and the mix considerably.
We use corrective EQ to remove or significantly reduce the audibility of the objectively ‘bad’ parts of the sound, thereby leaving us with only the objectively ‘good’ parts of the sound for enhancing and integrating into our mix. As always, after applying corrective EQ we should check the results against the original sound to make sure we have made an improvement and not just a difference.
Enhancing EQ
This is used to create subjectively ‘good’ sounds from the objectively ‘good’ sounds we made with corrective EQ as described above. What are subjectively ‘good’ sounds? They are sounds that contain no objectively bad sounds (which we removed with corrective EQ), and are good to listen to while also bringing musical value or feeling to the mix. We can do whatever we like with the objectively ‘good’ sounds to turn them into subjectively ‘good’ sounds, as long as we don’t inadvertently re-introduce the objectively ‘bad’ sounds we removed with the corrective EQ.
For this enhancing purpose we can use an EQ plug-in with character to introduce some euphonics into the sound. This could be a software model of a vintage tube EQ that imparts a warm or musical tonality, and/or something with unique tone shaping curves like the early Pultecs, and/or gentle Baxandall curves for high and low frequency shelving. Unlike the corrective EQ, the enhancing EQ doesn’t need corrective capabilities (a lot of vintage EQs did not have comprehensive features), and we can make up for any shortcomings here by using the corrective EQ and the integrating EQ.
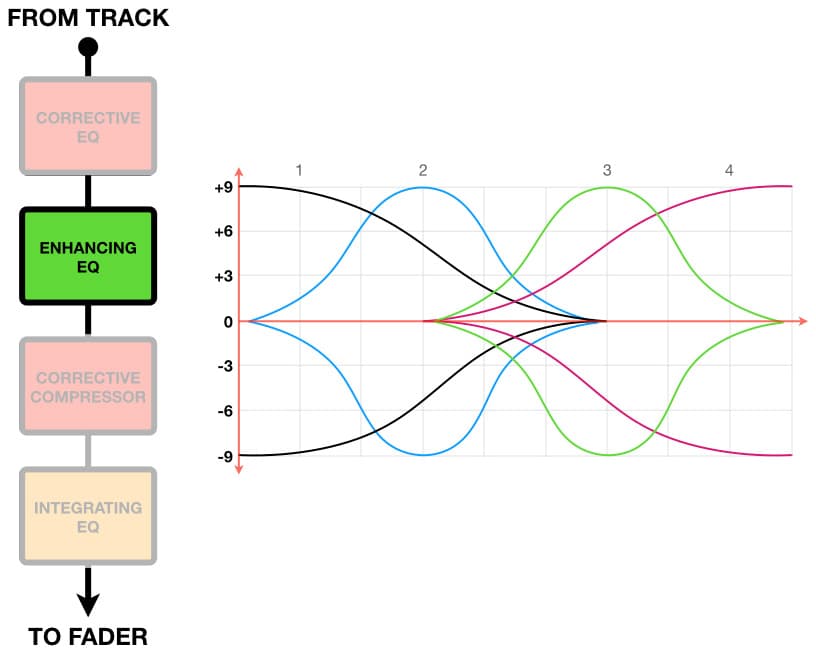
The enhancing EQ is where the creative aspect of mixing begins: crafting a collection of sounds that might be individually desirable but, more importantly, collectively help to serve the meaning, message or feeling of the music. One of the goals here is to bring out the musical character of each individual sound while giving it the desired amount of clarity so we can hear ‘into’ the sound and appreciate all of its harmonics and overtones, along with the expression and performance noises that help to bring meaning to the mood of the music. In other words, to enhance its musicality.
When applying enhancing EQ try to use frequencies that are musically and/or harmonically related to the music itself. Most Western music is based around the A440 tuning reference of 440Hz, so that forms a good point of reference. The table below shows the frequencies of the notes used for Western music based on the tuning reference of A440, from C0 to B8. The decimal fraction part of each frequency has been greyed out for clarity and also because we don’t need that much precision when tuning an enhancing EQ. Integer values are accurate enough…

If we jot down the frequencies of the notes that exist within the scale(s) of the piece of music we’re mixing, we can lean into those frequencies when fine-tuning our enhancing EQ. For example, let’s say we had an enhancing EQ that provided a small boost at 850Hz. It’s using a frequency that does not exist in any Western musical scale that is based on the A440 tuning reference; 850Hz sits in between G#5 (830.61Hz) and A5 (880Hz), and is therefore not a particularly musical choice. Nudging that enhancing boost down towards 830Hz (G#5) or up towards 880Hz (A5) will probably sound more musical and is, therefore, definitely worth trying.
We should always nudge our enhancing EQ boosts towards frequencies that do exist within the scale(s) of the music we’re mixing – we wouldn’t let a musician play out of tune, so why let an enhancing EQ boost be out of tune? Likewise, we should always nudge our enhancing EQ dips towards frequencies that don’t exist within the scale(s) of the music we’re mixing – if we’re going to dip some frequencies out of a sound, try to focus on frequencies that aren’t contributing any musical value. Less non-musicality means more musicality, right?
It’s also worth noting that when a sound responds particularly well to a boost or a cut at a certain frequency (let’s call that frequency f), it will probably also respond well to a boost or a cut an octave higher (f x 2) and/or an octave lower (f / 2). More about that shortly…
Integrating EQ
While corrective EQ and enhancing EQ are used for cleaning up and creating sounds, integrating EQ is used for combining sounds together, i.e. integrating them into a mix.
Creating good musical sounds with enhancing EQ is fun and satisfying, and might even be inspiring, but we must be constantly aware of how those individual sounds will interact when combined together in the mix. It’s common to have, for example, a piano and a strummed acoustic guitar that sound great individually but create sonic mud when mixed together because there is too much overlapping harmonic similarity between them. They are both using vibrating strings to create their sounds and therefore both have the same harmonic series, which makes it harder for the ear/brain system to differentiate between them if they’re playing similar notes and chords.
Another form of sonic mud occurs when composers create music using sounds from different sample libraries and ‘fader mix’ them together. Because each individual sample sounds great in isolation, the assumption is that simply fader mixing them together will sound even greater. That is like pouring a dozen of our favourite colour paints into a bucket and giving it a stir on the assumption it will create our ‘ultimate’ favourite colour. What do we get? A swirling grey mess, every single time, and it’s the same when mixing a collection of individually enhanced sounds.
That’s what integrating EQ is for: helping us to integrate – or ‘fit’ – the individually enhanced EQ sounds together into a mix or soundscape, ensuring they all work together while remaining clear and audible. As with our choice of corrective EQ, the integrating EQ should be a clean plug-in that does not impart any tonality or character of its own. A six-band fully parametric EQ with high and low pass filtering and the option to switch the lowest and highest bands to shelving is a good choice here.

We use integrating EQ to maintain clarity and tonal separation within a mix. We listen to how our enhanced EQ sounds affect each other when introduced to the mix, and we make appropriate tweaks with integrating EQ to fix any conflicts and restore the preferred elements of each sound. How?
INTEGRATING EQ EXAMPLE
Let’s go back to the earlier example of the piano and the strummed acoustic guitar, where each instrument sounded good on its own but both instruments lost clarity and tonal separation when mixed together. Imagine the piano and the acoustic guitar have been loaded into our Mixing With Headphones template. Using the individual channel solo buttons along with the spectrum analyser on the mix bus allows us to examine the frequency spectrums of the piano and the acoustic guitar individually. Conflicts between their frequency spectrums can be identified by temporarily adjusting both sounds to the same perceived loudness, then alternating between soloing each sound individually and soloing both simultaneously.
For this example let’s say that, due to our clever use of corrective EQ and enhancing EQ, both sounds are full-bodied and rich but therein lies the first problem: they’re both competing for our attention in the midrange. That means we have to apply integrating EQ with the goal of making them work together in the midrange.

We start by prioritising each competing sound based on its musical and/or textural role in the mix. We want to use minimal integrating EQ on foundation sounds and featured sounds that play musically significant parts, preserving the musicality and tonality that we’ve already highlighted in those sounds with the enhancing EQ. Textural sounds and background sounds are more forgiving of tonal changes so it is smarter to apply any significant integrating EQ changes to those sounds. Let’s examine the roles of the acoustic guitar and the piano in this particular piece of music to prioritise them accordingly.
Although the rhythm and playing of the acoustic guitar is helping the drums and bass guitar to propel the music forward, it is never actually featured in the mix of this piece of music. Therefore its primary purpose is textural; it provides a gap-filling layer of musical texture in the background. We can use a lot of integrating EQ here if we have to, as long as it doesn’t interfere with the acoustic guitar’s textural role.
What about the piano? In this piece of music, the left hand is playing a textural role with gentle low chords that complement the bass guitar and thicken the acoustic guitar. The right hand, however, is playing a musically significant role by adding sharply punctuating chords along with short melodies that fill the spaces between vocal lines, and those melodies often conflict with the acoustic guitar. These observations tell us that we can manipulate the piano’s lower frequencies (left hand, textural) as required to make it work in ensemble with the bass guitar and the guitar, but we need to be very conservative with any EQ applied to the midrange (right hand, musically significant) to avoid altering the tonality of the punctuating chords and short melodies.
Having established that the acoustic guitar’s tonality has a lower priority than the piano’s tonality in this piece of music, it is an appropriate starting place for applying integrating EQ.
Let’s make a clarifying dip in the acoustic guitar’s spectrum, right where the two sounds share overlapping peaks in their spectrums – which is almost certainly the cause of the problem.

This upper midrange dip will change the tonality of the acoustic guitar, of course. Fortunately, in this case it will make it more subdued and appropriate for the background textural role it plays in the mix. More importantly, however, it will contribute to the overall clarity of the mix by creating room for the piano without altering the piano sound itself.
To fine-tune the depth of the dip (i.e. how many dB to cut) and the width of its bandwidth (Q), we should switch the applied EQ in and out while soloing the guitar and piano separately and together and also checking the results on the spectrum analyser. We want to dip just enough out of the acoustic guitar to leave room for the right hand parts of the piano to be heard clearly, but no more.
We might find that the required depth and bandwidth of the dip has improved the clarity of the piano within the mix, but the acoustic guitar has become less interesting. We can musically compensate for this change in the acoustic guitar’s tonality by adding small boosts an octave above and below the dipped frequency in the acoustic guitar’s spectrum as shown below.

Again, switching the EQ on and off while soloing the instruments individually and together while watching the spectrum analyser will help us get the settings just right. [The compensating EQ technique shown above can be applied whenever a sound has been given a necessary integrating EQ peak or dip that subtracts some of that sound’s musicality: add small boosts an octave either side of any significant dips, and small cuts an octave either side of any significant boosts.]
The process of applying integrating EQ and compensating EQ to the acoustic guitar might reveal other areas worth working on. For example, let’s say this ‘soloing with spectrum analysis’ process revealed some upper harmonics in the piano sound that were worth bringing out. Applying a small integrating EQ dip in the acoustic guitar’s spectrum will create room for those upper harmonics of the piano to shine through, and applying a small compensating EQ boost in the acoustic guitar’s spectrum an octave higher will do the same for the acoustic guitar’s upper harmonics.

All of the integrating and compensating EQ changes detailed above have improved the clarity of, and separation between, the acoustic guitar and the right hand parts of the piano by focusing on their respective textural and musical roles. We’ve already established that the left hand parts of the piano were playing a textural role, as is the acoustic guitar, so let’s see how they sit alongside one of the mix’s foundation sounds that shares some of the same spaces within the frequency spectrum: the bass guitar.

Adding the bass to the piano and acoustic guitar, and switching/solo’ing between them, shows that there is some worthwhile upper harmonic detail in the bass sound that fits nicely into a natural dip in the piano’s spectrum but is being masked by one of the complementary EQ boosts we added previously to the acoustic guitar. Because the bass is a foundation sound that we’ve already got sounding right within the foundation mix, we want to avoid altering it if possible because it is one of the internal references for our mix. Rather than boosting the upper harmonics of the bass, we’ll reduce the complementary boost added previously to the acoustic guitar just enough to allow those upper harmonics of the bass to be audible again – as shown below.

This process has also revealed that between the bass, the left hand of the piano and the acoustic guitar there is more low frequency bloom in the mix than we’d like. It’s not necessarily boomy or wrong, but it is bordering on sounding bloated and muddy in the low frequencies – especially when compared to the low frequencies in the reference track we added to the Mixing With Headphones template before starting this mix. We don’t want to change the low frequencies in the bass because we got them right when establishing the foundation mix, and we know that any alterations to the foundation mix are likely to result in a ripple of changes throughout the mix. In this example, reducing the low frequencies of the bass to minimise the risk of the mix sounding ‘bloated’ will make the kick sound as if it has too much low frequency energy or is generally too loud. This will lead us to make changes to the kick, and the domino effect will topple through the mix from there.
Because we’ve been working with the acoustic guitar so far, we’ll start there by adding a subtle low frequency shelf or a gentle high pass filter to pull down its low frequencies just enough to clarify what is happening between the bass guitar and the left hand of the piano parts.

From here we can see the left hand parts of the piano sound, which are playing a textural role, are the remaining cause of the excessive bloom. We can wind them back with some low frequency shelving or a gentle high pass filter on the piano’s integrating EQ.

While we’re working on the piano, let’s bring out those upper harmonics we revealed earlier by adding a small boost in the piano in the same area we previously made a small dip in the acoustic guitar.

All of the integrating EQ and compensating EQ changes detailed above have resulted in the bass, piano and acoustic guitar sitting together clearly and musically in the mix, and yet most of that improvement was achieved by making changes to the lowest priority sound of the three: the acoustic guitar. Its entirely textural role in the mix made it the most sensible choice to make integrating EQ changes to. Two very subtle changes were made to the piano to improve its placement in the mix, and no changes were made to the bass guitar – which is in keeping with our goal of using the foundation sounds as a point of reference to build the mix around.
We should not get too hung up on soloing the acoustic guitar and worrying about how its sound has been changed by the EQ when heard in isolation. The reality in this situation is that it doesn’t matter what the acoustic guitar sounds like in isolation (i.e. when solo’d) because the listener is never going to hear it in isolation, and that’s because it is never featured in the music. It remains a background textural sound. Therefore the only thing that really matters beyond its musicality is how it affects other sounds in the mix. In this example, the applied integrating EQ has allowed the guitar to sit nicely behind the piano rather than under it. As we will see in the following illustrations, the acoustic guitar’s spectrum (and therefore its tonality) has been altered to allow it to fulfil its spectral role in the mix: filling in the spaces between the other instruments.
The illustration below adds the kick drum’s spectrum (shown in orange) to the image so we can see how it works with the bass and the piano.

As shown above, we have used the strategic application of integrating EQ to alter the perceived volume of each sound in the mix by a combination of boosting important parts of a given sound’s spectrum and/or cutting parts out of competing sounds’ spectrums, rather than making global ‘brute force’ fader changes. Each of these sounds was already loud enough in the mix, it just wasn’t clear enough, and we’ve used integrating EQ to clarify it.
The illustration below shows the spectrums before any integrating EQ was applied. There is too much overlap in significant parts of each sound’s spectrum, resulting in a poor mix that is lacking in clarity and tonal separation.

Complementary EQ, Shared EQ & Opposite EQ
In the integrating EQ example given above we introduced the concept of complementary EQ, where an EQ cut was accompanied by complementary boosts applied to the same sound, typically an octave (or other harmonically valid interval) above and/or below the centre frequency of the cut. If the cut was, say, -2dB at 880Hz, the complementary boosts would be placed at 440Hz (an octave below 800Hz) and 1.76kHz (an octave above 880Hz).
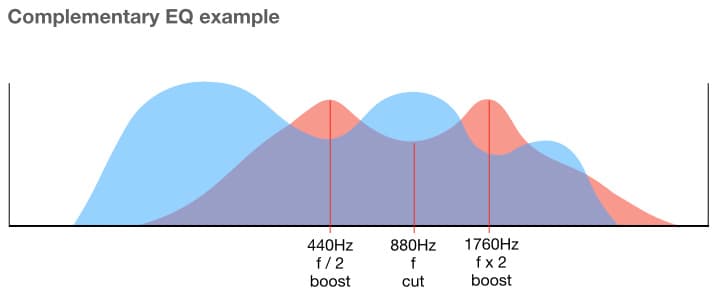
Each boost would have the same bandwidth (Q) as the cut, and each boost would start at +1dB with the intention of collectively returning the 2dB that was lost to the cut (conceptually aiming to maintain the same overall energy in the signal but redistributing it within the spectrum). However, the amount of boost and the choice of frequencies will ultimately be decided by ear, because nobody cares about the theory if the end results don’t sound good.
Sometimes an integrating EQ dip has an adverse affect on the sound it is applied to, and in those situations we can resort to shared EQ. The integrating EQ example shown above started by placing a dip in the acoustic guitar’s frequency spectrum to clarify the piano sound. Let’s say the dip needed to be -3dB at 880Hz with a bandwidth (Q) of 1.5 in order to do its job, but the change to the acoustic guitar’s tonality was more than we were willing to accept. In this situation we can copy that same EQ on to the piano, and share the 3dB difference between the two instruments. For example, perhaps a dip of -2dB is acceptable on the acoustic guitar, and we can make up the difference with a +1dB boost in the same part of the spectrum on the piano without adversely affecting its tonality. Now we have created the same 3dB difference at 880Hz required between the piano and the acoustic guitar, but have changed it from one large EQ change on one instrument to two smaller EQ changes shared between two instruments.

When using integrating EQ with sounds that are competing with each other but not in any clearly obvious or significant manner, it’s worth taking advantage of differences between each sound’s frequency spectrum by using opposite EQ. For the integrating EQ example used earlier we saw that the piano sound had a peak in the upper range of its spectrum where the acoustic guitar did not, and we put a subtle dip of matching bandwidth (Q) at that place in the acoustic guitar’s spectrum to increase the separation between the two sounds. This use of integrating EQ might have no significant effect on the acoustic guitar’s sound (perhaps the acoustic guitar doesn’t contain much musical value in that area) but creating the dip will further separate the two sounds while bringing the piano forward in a way that sounds better than boosting the peak on the piano’s spectrum – which might sound unnatural or perhaps even make certain notes ‘ping’ out (for which the piano tuner ultimately takes the blame).
TONAL PERSPECTIVE
After applying corrective EQ, enhancing EQ and integrating EQ, it is always important to check the tonal perspective of each sound. Does the tonality of each individual instrument sound as if it belongs in the same mix as the other instruments?
It is easy to lose track of tonal perspective and end up with one or two sounds that are very good when heard in isolation while also maintaining clarity and separation in the mix, but they don’t sound as if they belong in the same mix, e.g. they’re considerably brighter or duller than the other sounds. They are not in the mix’s tonal perspective.
This is the same problem that happens when we start combining sounds from different sample libraries, as mentioned earlier. Each sample library brand has their own sound engineers, producers and mastering engineers, therefore each sample library brand evolves its own ‘sound’ in the same way that some sound engineers, producers and boutique record labels evolve their own ‘sound’. The samples might all sound good individually, but there’s no guarantee (or likelihood) that samples from different sample library brands will work together without some kind of integrating EQ. It’s like sending all of the drum tracks but nothing else to one engineer to mix and master, all of the guitar tracks but nothing else to another engineer to mix and master, and all of the vocal tracks but nothing else to another engineer to mix and master – each engineer might do a great job on their parts, but there is no guarantee or likelihood that the individually mixed and/or mastered stems will automagically work together when combined in a mix. The individual sounds need to be tailored to fit together using integrating EQ, not simply layered on top of each other using fader levels.
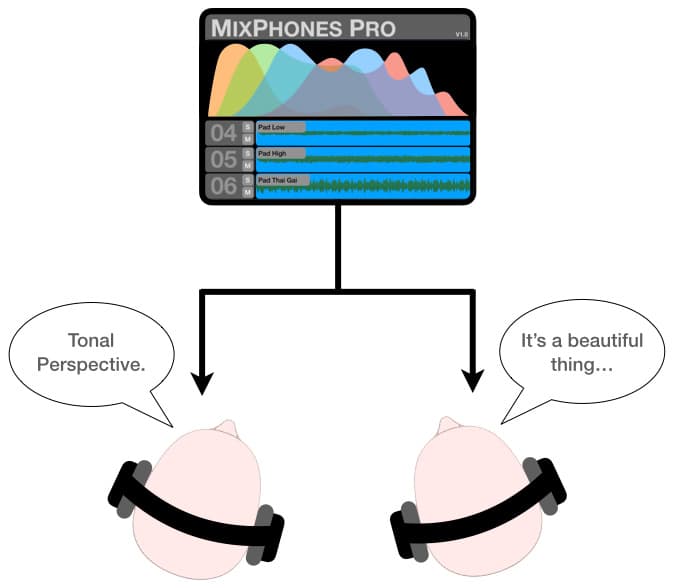
When EQing individual sounds within a mix we must ensure they all sound as if they belong in the same mix, i.e. they have the same tonal perspective. If one sound proves to be overly bright or overly dull within the mix it should be fixed in the mix, because fixing it later is going to take more time in re-mixing and/or more cost in mastering.
After introducing any significant EQ changes to a sound – whether they’re corrective, enhancing or integrating – always solo the sound and switch the EQ in and out while checking on the spectrum analyser and the 6dB guide to make sure the sound’s tonality is behaving itself and not steering the mix towards being too bright or too dull.
By following the strategic step-by-step process demonstrated in this instalment, i.e. introducing one instrument at a time to our mix and checking it on the tools built into the Mixing With Headphones template, we can make high quality mixes in headphones that, tonally at least, should land within five minutes of mastering to sound acceptable.
EQUAL LOUDNESS COMPENSATION
In the second instalment of this six-part series we looked at the Equal Loudness Contours and saw how our hearing’s sensitivity to different frequencies changes with loudness. Here are those Equal Loudness Contours again…
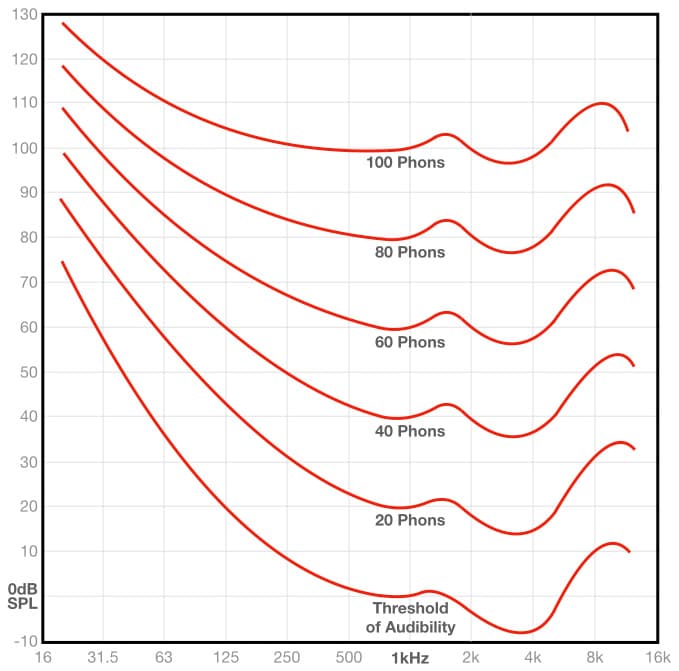
As we learnt in the second instalment, reducing the sound’s SPL means our hearing becomes less sensitive to the lower and higher frequencies compared to the mid frequencies of that sound. This doesn’t only affect our perception of the overall mix’s tonality, it also affects our perception of individual sounds within a mix. If a sound has been put into the correct tonal perspective with the other sounds but then turned down significantly in the mix to play an atmospheric background role, it has been shifted down to a lower Equal Loudness Contour than the other sounds and will therefore sound duller and lacking in low frequencies compared to the other sounds in the mix; it is no longer in the same tonal perspective and will easily get lost in the mix at times. A small EQ boost in the very high frequencies (above 8kHz) and the low frequencies (below 250Hz) can help these lost sounds remain clear and audible within the mix while retaining their tonal perspective. If an individual sound in the mix is intended to fade out to silence, consider automating a small high and low frequency boost that subtly increases as the sound’s level decreases in order to maintain its clarity as it fades out.
Radiant Fade Away
If we are working on a mix that has a long fade out – the kind where the music has been recorded playing on beyond the intended fade out – we can take Equal Loudness Compensation one step further by applying a subtly increasing boost of high and low frequencies (i.e. fractions of a dB below 250Hz and above 8kHz) over the mix bus for the duration of the fade out. This maintains the mix’s tonal perspective and clarity all the way down to silence, and can have an excellent effect when the intention is to fade out the mix rather than dull out the mix.
The EQ curve shown below, based on the Equal Loudness Contours shown throughout this series, is the compensation curve required for a mix made at 80 Phons (the recommended monitoring level for mixing) to sound tonally correct if replayed at the Threshold of Audibility (0 Phons, or silence).

The concept is simple: we apply an EQ curve like this over the mix bus, and automate it through the duration of the fade out (automating the EQ’s blend or mix control) so that all of the EQ settings are at 0dB at the start of the fade but have reached the levels shown on the curve by the end of the fade – as shown in the illustration below. This maintains a more consistent tonal balance as the mix fades out rather than dulls out. The mix continues to shine, all the way down to silence.
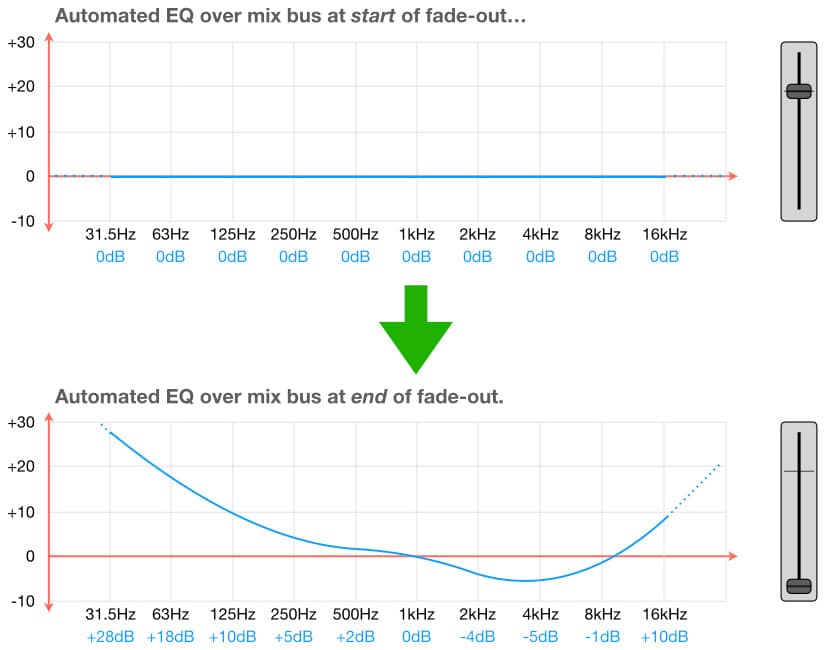
The ‘radiant fade away’ technique keeps hooks and choruses audible for longer throughout the fade out, maintaining the listener’s attention and keeping the music alive in their mind long after the end because the mix faded out but never dulled out as most mixes do; it doesn’t follow the traditional ‘end of song’ tonal trajectory.
As with all long fade outs, we must always keep it musically timed – meaning the last clearly audible and identifiable note at the end of the fade-out is also the last note of a measure, and the fade out reaches silence just before the first note of the next measure begins.
THE MOST IMPORTANT SOUND IN THE MIX
There is often a difference between what the composers, musicians, producers and sound engineers think is the most important sound in a mix, and what the listeners think is the most important sound in the mix.
Significance
Ask someone who isn’t a composer or musician to sing their favourite song. They will sing the vocal lines, and in between they will mimic drum fills, instrumental solos, echo effects or whatever grabs and holds their attention in between the vocal lines. However, they will always jump straight back to the next vocal line without missing a word, meaning the vocal takes a higher priority in their perception than anything else in the mix. They’re the people buying the music, and they don’t care what the composer, musician, producer or engineer thought was the most important sound when starting the mix. All that matters to the music consumer is what sticks in their mind, what they look forward to hearing again, and what ultimately pushes them to a purchasing decision. This ‘sing your favourite song’ exercise tells us a lot about which parts of a mix are the most important to the listener. If there are vocals, it is invariably the vocals…
Insignificance
Always remember that only guitarists, drummers and sound engineers actually care about how great the guitar or the snare sound is, and only guitarists, drummers and sound engineers buy recordings simply because they have a great guitar or snare sound. To everyone else those things are just another component of the mix with varying levels of importance. They’re not worth sacrificing the first hour of a three hour mix session for; as long as they serve their role in the music without distraction, listeners will simply assume that the sounds heard in the mix are the sounds that the artist intended. In contrast, the voice is something everyone can play (whether singing or talking), and all listeners will notice a poor vocal sound. Spending the first hour of a three hour mix getting the vocal right is a smarter use of time then spending it on the guitar or snare sound.
The same logic and thinking can be applied to instrumental music; focus on what holds the listener’s attention, and make sure there is always something to hold the listener’s attention – if there’s nothing in the music at a given time, fill the space with an echo or similar effect. It is up to the composer and musicians to provide the notes, and the engineer to deliver those notes with clarity and separation while also using the gaps between the notes as required and/or appropriate.








RESPONSES