

Review: Summit Audio ECS–410 Everest
The Summit Everest channel strip brings new meaning to the term ‘peak performance’.
By Greg Walker
22 June 2009
Summit is a name that’s been synonymous with quality audio kit for many years now. Its outboard analogue mic preamps, compressors and EQs are all highly regarded. Recently, the boffins at Summit HQ decided to throw all these processes into one box in an attempt to build the channel strip from hell. The result is the ECS–410 ‘Everest’.
The Everest is a silver 2RU beast that successfully crams all the above goodies under one bonnet, along with some other interesting and useful innovations. These include: a switchable solid-state or tube mic input and output drive circuit; two different compression topologies; and a proprietary push-button routing matrix. The Everest also has a multitude of I/O on the back panel that allows each module of the channel strip to be accessed and used independently. A lot of features on offer then… and since the name implies a pinnacle of sonic design, let’s take a few deep breaths, dust off the old ice spikes and see whether Everest measures up.
DINNER IN THE CLOUDS
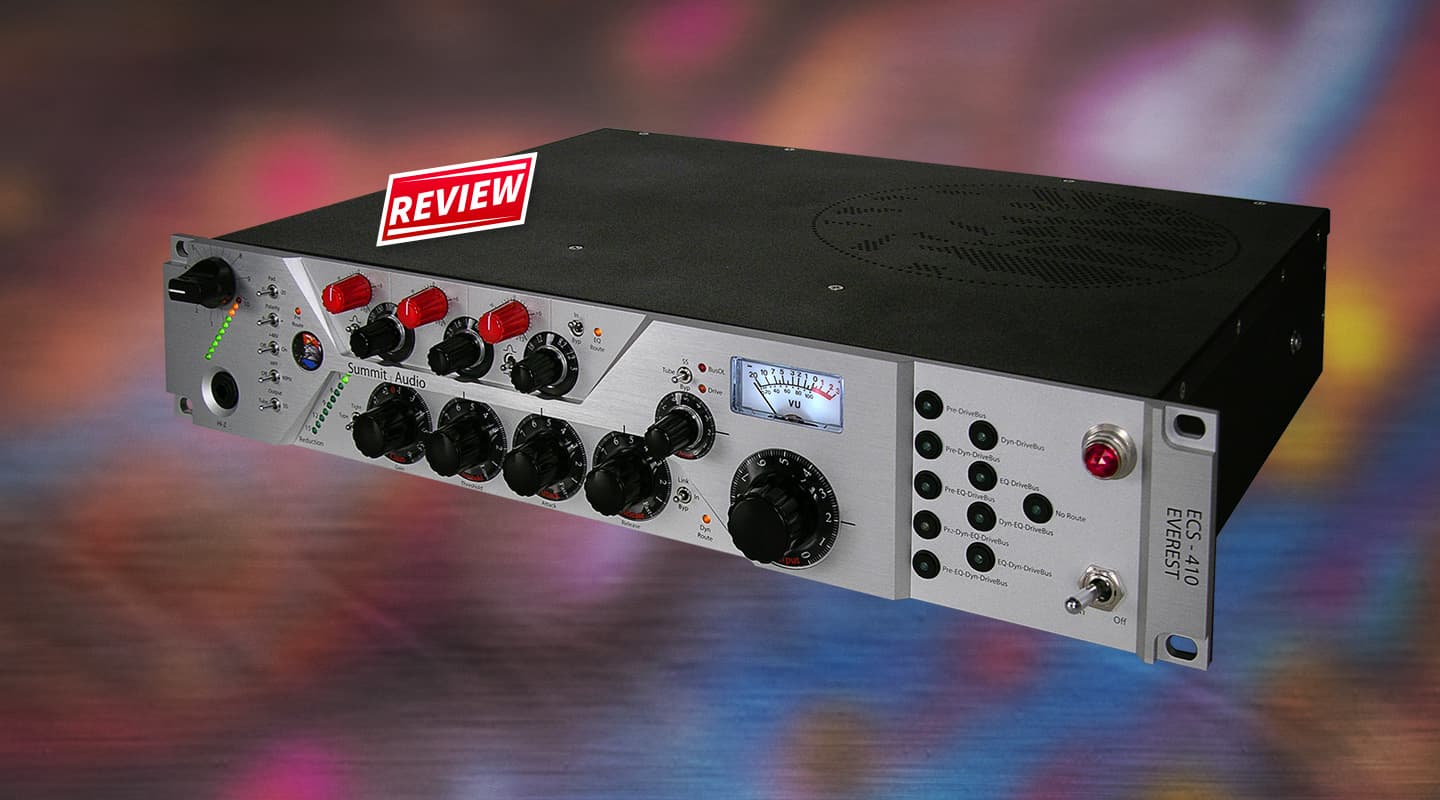
The standard of engineering and design that’s gone into the Everest is impressive, with high-quality components and short signal paths used from start to finish. The Everest uses two separate power supplies to isolate the audio path from the metering and control paths, and the build quality, in general, is fantastic. All the controls exhibit an expensive smoothness and functionality while the thick steel chassis inspires confidence and, more importantly, keeps stray RF fields at bay. The front panel sports a veritable smorgasbord of knobs, switches and buttons, the various processor elements of which are sensibly laid out in discrete sections.
THE PREAMP STAGE
On the far left-hand side of the unit are the Mz2 microphone and instrument preamplifier controls. These consist of a continuously variable input pot and mini toggle switches that engage: a 20dB pad, phase reverse control, phantom power, a high-pass filter that rolls off below 60Hz, and the choice of a solid-state or tube preamp stage. There’s also a 10-stage LED input gain meter, which lights up in a rather spiffy diagonal direction and a Hi-Z 1/4-inch jack instrument input. Mic signals are first pre-amplified using a discrete transistor stage before hitting a Jensen line-level transformer and a secondary tube/solid-state preamp. There’s also an RTS insert point on the back panel.
EQUALISATION
Next along the front panel are the Fe1 EQ and Dc1 Dynamics sections. Cosmetically, the Fe1 is reminiscent of Summit’s 1/2-rack FEQ-50 and shares many of the same design elements. It’s a three-band EQ utilising passive LC circuits, film capacitors, transistor buffers and a minimal signal path. Stylish black pots offer stepped frequencies (six per band) with shelving/peak toggle switches for the low and high bands. The smaller red pots above provide ±12dB of gain of each filter. The notable absentee here is any kind of ‘Q’ control – perhaps a victim of the limited front panel real estate. There’s also a hard-wired master bypass switch for easy comparison with the unprocessed signal.
DYNAMICS
Below the EQ lurks the Dc1 Dynamics section, which sports four large pots for: input gain, compression threshold, attack and release times. To the left of these is another diagonal 10-segment LED for monitoring gain reduction and a toggle switch for the two compression modes: Classic and Tight. ‘Classic’ mode offers traditional Summit signal-dependent compression that many will recognise from the company’s other devices; ‘Tight’ mode meanwhile introduces a noticeably more aggressive, higher-ratio compression. On the back panel are TRS jack inputs for stereo linking and compression side-chain insert as well as XLR I/O. On the right-hand side of the Dc1 is another hard-wired bypass switch that can also be lifted to link with another unit.
NEED TO KNOW

OUTPUT SECTION
To the right of the compressor controls is the Everest’s Db2 output/drive bus section, with its large potentiometer for master output, a smaller pot for output drive, a toggle switch for ‘solid-state’, ‘tube drive’ or ‘hard-wired bypass’, and an accompanying pair of red LEDs to indicate ‘drive present’ and ‘bus overload’. There’s also a lovely rectangular backlit VU meter that displays the output level. The output drive control is where the Everest gives you the chance to add some saturation to your signal via either 12AX7A vacuum tubes or high-voltage transistors. Both approaches have a distinct sonic signature; the Everest allowing you to add just a little or a lot, depending on the dish you’re serving up.
COMPLETELY ROUTED
Finally, on the far right of the Everest’s front panel, is the ‘Touchpatch’ routing control matrix. This is a group of no less than nine soft-contact buttons (each sporting an inset ‘active’ LED indicator) that allow you to route your signal through any or all of the unit’s modules, in any order, at the touch of a button. There’s actually not much to say about this other than that it’s very easy to operate and looks pretty funky. Let’s say you decide to pull the compressor out of the chain, for example. In this situation it’s simply a matter of hitting one button and, bingo, not only is the compressor then bypassed, you can also patch it across to a completely different source via the rear panel connectors. It’s an interesting design option that makes the Everest far more versatile than your average channel strip, one that certainly helps it stand out from the pack. Rounding out the front panel are a classic large toggle power switch and red jewelled power indicator (á la a vintage Fender amp) – very tasteful!
VIEW FROM THE SUMMIT
My first experience with the Everest was on a session recording kick drum using a close-miked Beyer M88. I set the ‘Patchpath’ to a conventional Mic pre/EQ/Compressor/Drive bus routing, and within a few moments I had a good clean solid kick drum sound happening. A bit of EQ and some gentle compression and I was away. My first impression was that the Everest not only sounded good, it seemed very straightforward to use, despite all its bells and whistles. Later, I went for a more compressed room sound on the drums using a Neumann U87. Here again, in ‘classic’ mode, the Dc1 compressor did a great job of magnifying my space’s reflections. Both compression modes are very useful: it’s a smooth and forgiving compressor in general use, despite being good at getting ‘down ’n’ dirty’ in ‘Tight’ mode. Where it really shines, however, is in the task of transparently lifting and controlling sound elements like vocals and bass guitar in particular.
On vocals the Mz2 mic preamp was very tasty indeed, with its detail and silkiness really enhancing some great performances. I recorded several different voices through it using different mics, and each time the Everest seemed a good match, exhibiting great transparency, a sweet tonal balance and a definite hi-fi character that I really enjoyed. I experimented a bit with the tube/solid-state preamp options and found I liked both – the solid-state is a little cleaner and the tube a little grainier (inevitably), which suits some voices but not others. On one vocal track in particular we went for a gritty, retro-style vocal tone where I ended up, somewhat alarmingly, with the drive bus gain accidentally set to ‘10’ in tube mode. Even then, the vocal still sounded relatively clean; the drive bus really bringing out the breath and chest part of the singer’s voice to the excitement of all involved. The Fe1 EQ is also extremely musical, further enhancing the fidelity of the outcome. Its strength is flavour enhancement rather than sonic surgery – once again, a very hi-fi experience typical of good quality, high-end passive EQ.
I used the Summit on everything from glockenspiels and vibraphones to bass amps, classical guitars and ukeleles, and I never once found myself opting for another outboard pre. When I wanted to bypass the compressor or the EQ, or swap the order of processing, I just hit the appropriate button and moved on – the routing matrix is a very neat solution to a potentially time-consuming process. I’d have to say the Everest is an absolute winner as a tracking tool and pretty much covers every base you’d want from a single unit while making the whole process very easy and intuitive.
The Everest not only sounded good, it seemed very straight forward to use, despite all its bells and whistles.
HORIZON LINE
After using the Everest for general recording duties for a few weeks I decided to delve a little deeper and do some reprocessing through the line input; one of the dark arts of the audio world and a good test of a processor’s limits. First, I routed a whole multi-tracked drum take into the Everest and played around with various combinations of compression, EQ and output drive, with some tasty results. Kicking in the ‘Tight’ compression mode definitely pulls things into line in a powerful yet musical way and the EQ is flexible enough to create a wide variety of treatments. Dialling in more output drive adds grit and punch and also seems to brighten things up a little (easily countered by a small amount of subtractive top end EQ where required).
The drive bus only offers a subtle saturation effect – it’s not an out-and-out distortion device. To do that, you’ll need to crank the output gain of the dynamics section to overload the drive bus. I really enjoyed reprocessing vocals through this unit: its ability to dramatically rework the tonality and dynamics of a performance are enticing and rewarding. On a female vocal I got a great effect by shelving out all the top and bottom frequencies and pushing the 1.6kHz midrange band way up, then mashing it through the compressor in ‘Tight’ mode and giving it a lot of drive bus grit. The result was a great telephone-like tone with a very subtle distortion, but with a residue of hi-fidelity that was nothing like a heavy-handed plug-in effect. I also discovered that, if you switch the router to a different order of processing when working with line input sources, you have to re-route your signal to the appropriate first processor, otherwise you don’t make it past base camp! This is my only minor quibble with an otherwise brilliant unit.
With the generous number of I/O options available on the Everest, all kinds of aural outcomes are possible, including parallel compression effects that will keep you camped on the mountain for weeks on end. The Summit ECS-410 Everest may well have set a new benchmark for the channel strip, making the steep asking price well justified. Oxygen please nurse…


RESPONSES