Review: Ableton Push 2
Ableton upgraded the screen on its second generation Push, so you wouldn’t have to look at your computer again.
Review: Anthony Garvin
Back in 1997, I was a high school student with a newly developed passion for electronic music, and as a result, samplers. I saved my pennies up for the entire year just so I could buy an Akai MPC2000. Since then I’ve owned a significant chunk of the MPC range. So in 2013 when Ableton debuted its Push controller in collaboration with Akai, I was like a kid again, witnessing the perfect union of where I was, and where I’d come from. The melding of Ableton’s powerful software with Akai’s MPC-style hardware.
But the original Push never quite lived up to the fantasy for me. While it did inspire an army of Ableton users with new ways of interacting with their favourite DAW, I never quite gelled with it. I found Push’s workflow a little too cumbersome; constantly going back to the mouse and computer screen, rather than being immersed in the ‘instrument’ in front of me.
When Push 2 was announced I was optimistic it would fulfil my original hopes for Push, but my skepticism returned when I opened the box — it looked very similar to its predecessor while in stasis. Once I powered the unit up, however — and the multi-coloured screen came to life — things started looking different. Perhaps Ableton has learnt a few things from its first attempt.
ABLETON STANDS ALONE
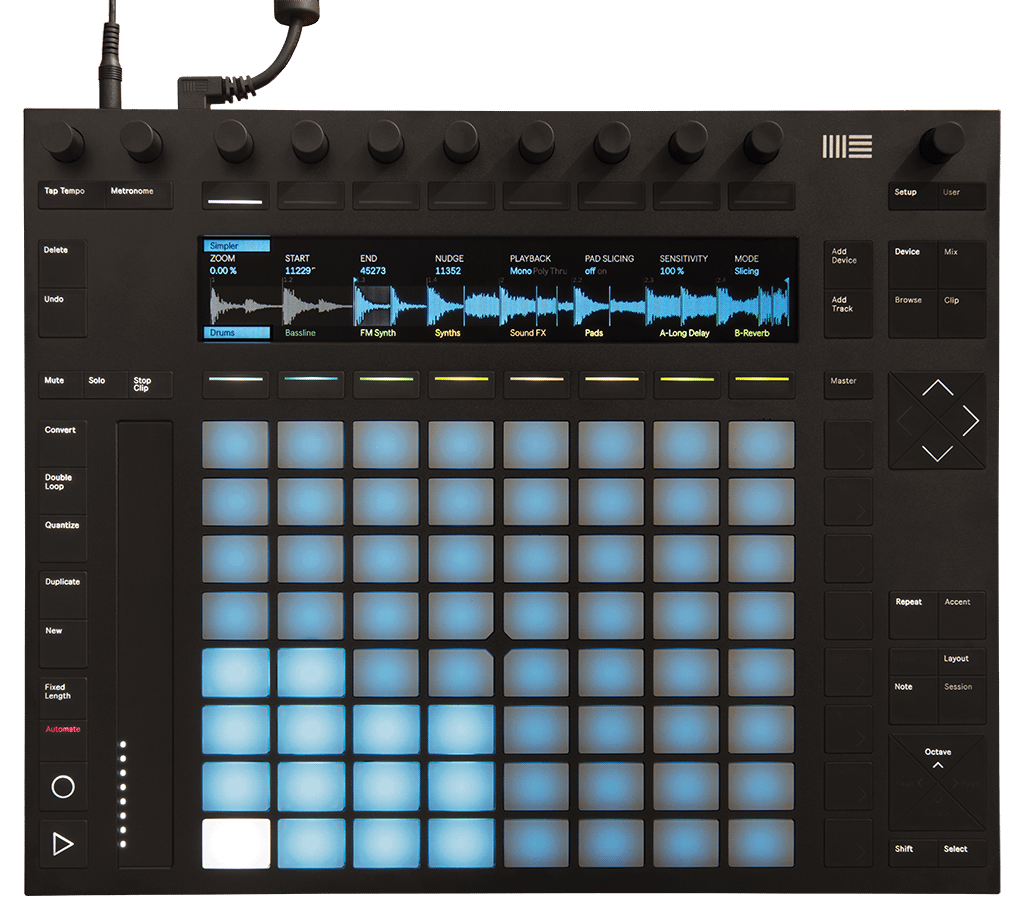
While Push 2 is slightly larger than Push, from a physical perspective it’s got a load of similarities — hence the unboxing double take. It has the same 8 x 8 pad layout, roughly the same number of buttons, a similar touch strip, and has stuck with 11 encoders (now all laid out in a line across the top). The chassis also appears to be made from the same rubber-coated plastic shell, although the top-plate is now constructed from aluminium for any highly active Pushers.
I’ve also been informed that Push 2 is now entirely made by Ableton, having ended its partnership with Akai after production of the original Push ceased. From a user perspective, this seems to be a minor detail, especially considering manufacturing is still based in China. But now that design is wholly Berlin driven, it means Ableton’s software and hardware are better linked than ever. It’s actually the accompanying Live 9.5 software update that paves the way for Push 2’s fundamental workflow updates. Only some of these updates apply to the original Push, which Ableton says it will continue to support for the time-being.
INITIAL SCREENING
Ableton hasn’t revolutionised the Push concept with version two, instead opting for a large number of more subtle changes — button changes here, encoders shifted there. With one obvious newcomer; the large, high-resolution colour screen, which replaces the old monochromatic display. Ableton has said goodbye to the dot-matrix printer look but hasn’t gone so far as to embrace smartphone technology — it doesn’t have touch screen capabilities. Although it’s somewhat ironic that a hardware controller needed a better screen to improve its hands-on experience, the new screen is a major step up that gives Push 2 a more elegant feel than its predecessor. And it’s all about the feel with hardware.
The screen has a resolution of 960 x 160 pixels, is apparently brighter, and viewable from almost any angle. While brightness never felt like much of an issue with Push, this wider angle of view was a revelation; no matter where I stood, or sat, in the studio the screen was clearly visible and readable. Now you can still keep a visual connection with Push even when you swap to a synth in the corner of your studio.
In practice, the colours and higher resolution means Push 2 doesn’t just look better, it works better too. Importantly, it also allows you to get your head around it much faster. New tracks in Live 9.5 are automatically assigned a colour, which flow straight through to Push 2’s display. It’s the same with Devices, they also replicate the colour-coding in Live, making it much easier to navigate and keep track of where you are in the session.
Flipping over to Mix mode, the metering on Push 2 arguably looks better than in Live itself! The screen also has a new party trick — it can display audio waveforms in great detail. In fact, the original Push had no audio-manipulation features, whereas Push 2 has many.
There are now software-assigned buttons both above and below the screen (Push only had buttons below). Rather than adding complexity, doubling the number of automatically assigned buttons makes using Push 2 easier and quicker. For example, in Mix mode, the buttons below the screen are assigned to track selection, while the buttons above allow for switching the encoders between volume, panning and send levels. In Device mode, the lower buttons allow for instant switching between tracks (like in Mix mode), but now the top row of buttons allows for instant selection of the instruments or effects within the track.
One button that would really put some distance between me and my mouse though, would be a Save button. It’s still not there on Push 2!
NEED TO KNOW
Ableton Push 2
Live DAW MIDI Controller

BUTTON PUSHERS
After the screen, the buttons on Push 2 are the next most obvious hardware upgrade. Overhauling their design entirely, Ableton has made the buttons lower profile, backlit in an easy-to-read white, and they now have an obvious ‘click’ when pressed. Whilst ‘clickiness’ might not be at the top of anyone’s feature requests, it is another subtle workflow aide — no more second guessing yourself.
If ‘clickiness’ wasn’t on your list of assessment criteria, I bet ‘squishiness’ wasn’t either. Nevertheless, that’s what I like about the new pads on Push 2. While they superficially appear the same as the original, their ‘squishier’ response feels just right. When finger-drumming, the pads are more dynamic allowing for more performance finesse, and you don’t have to bash the pad to get higher velocities. The backlighting of the pads is also more pleasing to the eye, adding to the device’s overall elegance.
It’s amazing how much rearranging some buttons and adding a screen can alter workflow. A lot of my reasons for guiltily returning to the laptop when using the original Push are no longer a problem. Browsing has become quicker, simpler and more powerful, and the screen delivers a much more detailed level of navigation. The re-organised arrow buttons on Push 2 allow for much faster folder navigation than the sometimes slow and fiddly process of twisting an encoder. The biggest browsing development is being able to load AU/VST plug-ins via Push 2 as well as audio files. It seems a little crazy that this wasn’t possible until now, but adding audio to a Live project via Push 2 really unlocks the other 50 percent of Live — audio manipulation — that wasn’t previously accessible from hardware.
SLICE ’N’ DICE
In Live 9.5, when adding audio into Live via Push 2, the sample turns up on a MIDI track inside a newly designed Simpler. From here, there are a number of options for manipulating the audio via Push 2. The default ‘Classic’ mode puts the encoders in control of the audio in a similar way to an MPC; sample start and end points, looping, etc. But the fun really begins when working with loops and changing the mode to ‘Slicing’.
Rather than playing the loop at various pitches, Slicing mode distributes slices of the loop across an 8 x 8 pad grid that are playable, recordable and sequence-able. The screen displays how Live has sliced the audio across the waveform, and you can adjust slice sensitivity and nudge the slicing point with the encoders. Pushing the Layout button then allows each of the slices to be step-sequenced on Push 2’s pads just like a Drum Rack (though it’s still Simpler, not a Drum Rack).
Push 2 also has a ‘Pad Slicing’ feature, which allows for real-time slicing of loops via the pads. Simply set the slicing sensitivity to 0%, turn Pad Slicing on and hit the first pad. The loop plays in entirety, but as you hit subsequent pads, the loop is divided up as per your triggers. From here you can re-program loops in infinite ways.
After discovering these new audio manipulation features, I’ve been ‘wasting’ hours going back through old loops and finding new ways to use them.

MORE TWEAKING
With only eight soft-assigned encoders, the original Push’s ability to tweak instruments or effect devices was limited. Operator was an obvious example. It’s a feature-packed synthesiser, and eight parameters was never enough. The extra soft-buttons in Push 2 organise the various synth parameters into paginated soft-buttons like Oscillators, Oscillator Envelopes, Filters, etc. Now it actually feels like you have the whole device right in front of you, not just a preset.
Also along those lines, tweaking third-party plug-ins with Push has always been doable, but quite clumsy. Plug-in parameters had to be mapped every time a new plug-in or preset was loaded. With Push 2, default configurations can be set up and saved with each plug-in. While a little cumbersome to initially program, once done, it allows every parameter to be controlled via Push 2. Furthermore, the parameters are paginated in banks of eight, like Live’s more complex instruments. Unfortunately it’s presently not possible to name the banks in the same way the native devices do.
PUSHING OFF
Overall, I’ve been pleasantly surprised with Push 2 — the refined design has relegated many of my gripes with the original Push. Push 2 is much easier to get around, the pads feel good, and the larger screen eases any menu confusion. All of which adds up to making music faster and more intuitively from the hardware, or should I say, ‘instrument’.


RESPONSES