
Review: Ableton Live 11
Ableton’s flagship DAW adds some more pro production features, but has it kept its sense of fun?
Any ‘whole number’ DAW release comes with a price. There’s the actual price, you know, the money thing. There’s the price associated with the risk of adopting new software too early. Then there’s the time soak. Could you really be bothered upgrading if it’s going to mean any deviation from your normal routine?
Right off the bat, Ableton Live 11 is worth it for me. I’ll readily concede that what makes the upgrade worth it for me (ahem, comping) might be a waste of time, and therefore money, to you. However, it seems that Ableton has made sure to throw in at least one compelling feature for every taste. For edit hounds, to go with comping, there’s also linked editing and a scale highlighting option for note editing. For expressive players, MPE has arrived with a solid implementation that makes it easy to visualise and edit parameters. Those that like it a bit random will welcome the new built-in randomisation and chance features, as well as the Inspired by Nature series and Spectral devices. Long-time users of Ableton in a live context haven’t been left out either. Macro counts have been doubled, snapshots enabled, follow actions have been reworked and can now be applied to scenes (hooray!), and Live can now follow the tempo of an audio source, which has limited recording applications, too, but more on that later. If you’re just looking for some new toys to play with, Suite users in particular are treated to an array of new packs and effects, including Hybrid Reverb (Ableton’s best reverb by a mile), spectral filter effects, and a solid collection of useful packs.
Let’s dig in and see if Live 11 is worth it for you, too.
A RETURN TO COMPTOWN
I was a latecomer to the Ableton party, holding on desperately to a solely linear workflow for music production, and never dreaming of using playback live. After finally getting my hands on a copy of Ableton Live 9, and then my head around how a scene-based workflow could jumpstart my creative juices, I was hooked, and now it’s a staple in my live sets, too.
Coming from Logic and Pro Tools, I could handle the lack of editing tools, but Ableton has stubbornly held on to its electronic musician’s toy chest perception. Dispensing with ‘serious’ tools in favour of fun. The idea of labouring over a section of music seems at odds with Ableton’s manifesto. When it comes to getting ideas down into coloured blocks, thou shalt not delay, except as an effect, in which case, go wild.
Still, one omission seemed to sit on the fence, swaying between the backyards of ‘fast and loose’ and OCD. Namely, comping.
When comping was stripped away from me back during ‘the move’, I still managed. Mind you, I did try all the workarounds in a desperate attempt to imitate the feature but eventually gave up trying. In many ways, it was a net benefit to go back to tape-style tracking. Having to delete a section in order to redo it really made me pay fresh attention to each recording’s pitch, timing and rhythm. It also forced me to pay better attention to how each part fit as I was laying it down. I couldn’t go back and select another take if my arrangement started to go awry.
On the other hand it was time to take the kid gloves off. I felt I’d been around the DAW block enough times to be entrusted with a tool that had become a staple of every other mainstream DAW. Besides, it doesn’t have to be used to craft the perfect take, it’s just as likely to be used for improvisation.
NEED TO KNOW
Ableton Live 11
Digital Audio Workstation
BUT DOES IT COMP?
Ableton’s comping implementation works largely the same as other comping systems, and across both audio and MIDI channels. There are three ways of manipulating your comp. The easiest is by hitting ‘B’ to enter Draw mode and just run the pencil cursor over the bits of takes you want. If you’re not in Draw mode, you can click and drag to highlight the section you’d like to send to your comp, then hit Enter. Once you’ve got your comp in the ballpark, you can also drag the split points between takes around.
If you pre-colour your takes, you can use that to easily identify which takes make up your comp. However, you have to do it before making any selections, as the colour of your comp lane selections don’t automatically update if you change the take lane colours after you’ve made a selection.
This is true to the protectionist behaviour of the comp lane. Once you’ve sent a take lane selection to the comp, anything you do to that take — quantize, change notes – won’t automatically update the comp version. In fact, if there’s a discrepancy, it will deactivate the highlight on your take lane, and you have to select that section again. It means your edit is always preserved until you actively change it.
In an Ableton twist, you can insert blank take lanes at any point, bringing some of that Session view flexibility to Live’s Arrangement view. In those blank lanes, you can drop any loops you like and randomly highlight take lane regions to make some creative edits.
LINKED EDITING
To go along with the comping feature, Ableton also included Linked Editing. It’s basically a must if you’re comping takes from multiple mics on the same instrument like drums. You can’t set up multiple edit groups like Pro Tools, there’s only one group of Linked Tracks at a time, designated by a resistor-looking icon next to the track name. Using Linked Tracks you can fade, trim, split and delete multiple tracks at once, you can also simultaneously select the same take from multiple tracks to send to your comp. Beyond that, it’s a really a dip-in/dip-out tool, and automation remains on a per-track basis.
FOLLOW TEMPO
On the complete opposite side of the coin is the live tempo follow feature. It’s a feature largely aimed at a particular use-case, or should I say, type of live ensemble where you have playback with a live drummer. It ‘can’ do other things, but this is where the feature excels, or rather, is reliably successful.
To set it up, you toggle it on in the Link/Temp/MIDI section of your preferences. Set the external audio input source from your interface and you’re ready to go. It can be from a dedicated ‘tempo mic’ but can also be an audio input that’s feeding your session.
In my tests it also seemed to respond better to louder sources, so make sure your preamp is gained up, and also likes a bit of low or mid range. Counter intuitively, it doesn’t do anything when you give it the ol’ drumstick click ‘1, 2, 3, 4’. Best practise would be to have a tap tempo device handy to dial in the range of your tempo prior to, or at the beginning of, your performance.
It also only likes to change incrementally. While I could double the tempo of a song from 80bpm to 160bpm, I had to slowly ramp it up over a minute. Sudden jumps won’t register at all and if your source/drummer isn’t always within a 5bpm range (max), you run the risk of skipping a beat altogether.
It has its applications, but it would require fastidious preparation to incorporate it into a live set. It will follow along with more complex inputs, like guitar, but it doesn’t reliably track yet to hold over the duration of a take. In the future, I could see this being a great tool for recording because you can use it to record song tempo automation while tracking. It means you could theoretically record a singer-songwriter without a click, track the tempo of their guitar, then lay an arrangement down to the tempo they were most comfortable with. That’s theoretical though, it would often take a little while to find its feet and wouldn’t reliably lock in each take.
BIG KID’S MIDI, MPE ARRIVES
Besides vocal comping, another feature Ableton users have been baying for is MIDI Polyphonic Expression (MPE). Well, it’s finally arrived. It’s not ubiquitously applied to all of Ableton’s built-in synths, and in the current beta state, not all MPE plug-ins automatically work. However, it is fully enabled in all versions of Live and come launch time, I’d expect most incompatibilities to be largely sorted.
Overall, MPE has been well-implemented by Ableton, managing to fit its innate complexities into the interface without it feeling too squeezed. There’s also a handy MPE Control MIDI plug-in, which allows you to adjust the plug-in’s response to an MPE input so you can perform functions like inverting a parameter’s response to make pitch go up when you swipe down, or adjust curves to make a parameter ramp up exponentially in response to constant pressure.
Of Ableton’s own synths, only Wavetable, Simpler and Sampler have been updated to handle MPE. Sampler allows you to assign two parameters to each of the MPE axes, whereas you can use Wavetable’s modulation matrix to add multiple parameters to each MPE axes. Simpler is fairly limited, with no control over or visual of what parameters are being modulated. It seems most are limited to per-note pitch controls.
If you don’t own a fully-capable MPE device, both of Ableton’s pad controllers, Push and Push 2, can now employ polyphonic aftertouch to activate the Pressure axes of MPE, which makes them much more expressive devices.
POWER USER MOVES
There are a lot of subtle, but powerful changes to the Live interface. Most of which reside in the Clip View of MIDI tracks where you edit your piano roll.
Loop, time signature and groove settings are all combined under the main header now, with the launch/follow action panel expandable when in Session View. All other functions have been separated into tabbed panels. There are Notes/Sample and Envelope tabs for Audio and MIDI clips, with an additional Expression tab for MIDI clips. You can shortcut between each tab with Option+1, 2 or 3. Let’s take a look through some of the updates to the MIDI clip view.
Randomize – Once you’ve programmed or played your sequence, you can randomise velocities and the chance that each note triggers. Set your range — 0-127 for velocity and 0-100% for chance – then select one or more notes and hit ‘Randomize’. Ableton will then move those values around their starting place within the range you set.
To really unleash the randomness, you can also set a range of possible velocities for each note by grabbing the pin head and Command [Mac] or Control [Windows] dragging it up or down. A dot appears in the pin head once you’ve set a velocity range, with a highlighted zone to denote your range. Also, if you select a chance value other than 100%, a grey triangle appears in the top right hand corner of that note.
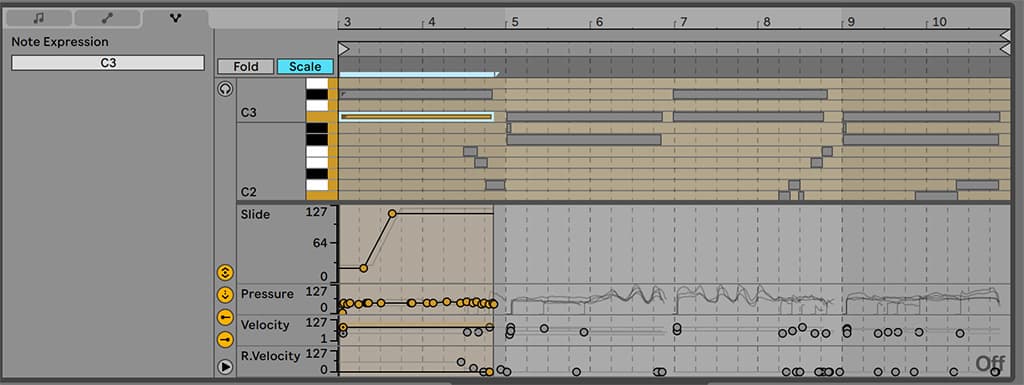
Scale Features – There are now three levels of scale representation in the Piano Roll. Firstly, you can toggle the scale view on or off under the main header. This highlights which notes in the piano roll are in your scale. Secondly, you can press ‘K’ and that will highlight each note lane in your scale as well as make the root notes more prominent. Lastly, next to the Fold toggle is a Scale toggle, which folds to only the notes in your preselected scale. That way, any note you draw in the piano roll will be in key. If you already have notes outside your preselected scale, they will still display when folded but their lanes won’t be highlighted.
MPE Editing — Lastly, more automation lanes appear under the expression tab. Alongside Velocity, there’s Slide, Pressure and Release Velocity, allowing you fine editing control over your MPE parameters. MPE data is naturally complex to display, and Ableton has managed to keep these windows from being overly crowded despite the information they are carrying. While it’s fine to incorporate MPE, it’s not always easy to play accurately. So it’s great that Ableton has devised an effective way of viewing and editing your parameters.
FOLLOW ACTIONS
If you’ve ever tried putting together a live set in Session view, you would probably wonder why it’s taken until Version 11 to implement these changes to Follow Actions. There are two main changes. Firstly, you can now toggle on ‘Link’ to trigger the follow action at the end of the clip without having to specify the exact bar:beat value. Secondly, you can now apply follow actions to entire scenes! It can’t be linked, as it’s over an entire scene which would likely hold different clip lengths, so you still have to input a bar:beat value. Each scene also now has a distinct number, so when you rename your scenes, you don’t lose which number it is.
Both of these inclusions are massive time savers when setting up basic, user-controllable playback systems.
The third inclusion is another randomised chance feature. You can now set up two different follow action possibilities and then adjust a slider which alters the chance of Ableton choosing one or the other.
MACROS IN MANY VARIATIONS
Macros are indispensable when it comes to creating dynamic electronic live performances. In Live 11, you have 16 of them — up from eight — and can add or subtract them at will. If you just want one big knob, you can do that, or you can get ultra-granular.
There’s also now a Macro Variations section where you can save snapshots of your macro settings to quickly jump from one sound to the next. And because Ableton has decided to randomise everything in Live 11, you can randomise macros, too. It’s a simple way to get tons of sounds out of the one instrument rack; just keep hitting the randomise button to see what comes down the pipe. You can also exclude particular macros — like volume — from randomisation, or from including them in your Variations.
WRAPPING UP
It’s always a difficult task going through all the updates to a DAW. There are still some high-voted requests that didn’t make the cut, like ‘Bounce in Place’ or freezing groups down to one audio track. Another that would be a nice companion to comping is ARA 2 support for seamless integration with vocal tuning programs like Melodyne. However, Ableton is typically slow to move on external standards. After all, MPE was a long time coming.
Thankfully, Ableton has largely paid attention to users’ feature requests and picked some winners. Better still, the integration of MPE is solid and will hopefully make it a standard across MIDI plug-ins and devices going forward. For Suite users, there’s plenty more in the way of new packs and effects when you upgrade, so make sure to peruse the rest of this review to get a sense of the added value you’d be getting.
Pricing will depend on when you purchase. If you are new to Ableton, you can purchase Live 10 versions now for 20% off and receive a free upgrade to Live 11. You can also save 20% on upgrades from Live 10 to 11 if you purchase before the release date. Considering Live 11 will be released on Live 10’s three-year anniversary, the upgrade to Suite works out at roughly A$100/year. While it’s a bit to shell out at first — especially for Suite — the pricing works out a lot cheaper than any subscription-based DAW. The upgrade itself is almost a no-brainer if this is your DAW of choice.









Fantastic review. Thanks!