
Review: Ableton Live 10
Ableton has dropped the big 10. What’s inside?
10 is a big number. Any version 10 product deserves a decent splash. Apple even rushed out the iPhone 8 then skipped a digit just so the iPhone X launch lined up perfectly with the iPhone’s 10th anniversary.
Ableton Live recently rolled out its 10th edition. The last round number update was back in 2013, and that rolled into town with Ableton’s first hardware product sharing the saddle! Push’s debut was the kind of big splash you’d expect from a 10. So, has Ableton cannonballed or flopped into the pool with Live 10?
Firstly, there’s no new hardware. Ableton is still rocking the Push 2, which is not a complaint. It’s a rock solid, sexy piece of hardware, and it’s nice to not be tempted by next-gen hardware while deciding whether to upgrade your DAW.
Overall, 10 feels like a maturation. While the transition from Live 8 to 9 was all about hardware, Live 10 is Ableton cementing what it does best, sometimes at the expense of what it’s long forsaken.
(1) It seems minor, but Ableton’s new font — Ableton Sans — is a big deal. Compared to the previous off-the-shelf typeface, everything is less bold, more refined, and the browser section is better for it. While some users might prefer the development team to spend its time implementing music-related features, something as ‘simple’ as a new typeface reaches every nook and cranny of Live. It subtly improves every interaction with the software, rather than just one.
ARRANGED & AUTOMATION
It hasn’t all been subtle changes, but let’s stay in that mode for now before covering the new gear. Workflow has taken a big leap forward in the arrangement view. There are four enhancements allowing you to work directly with audio within the arrangement window, rather than resorting to the sample window or menus.
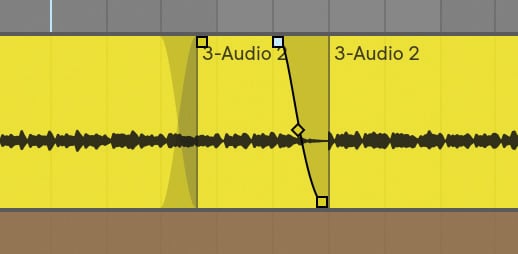
(2) Firstly, you can now slide audio around within a clip region by holding Shift+ Option to drag the audio by grid divisions, or Shift+Option+Command to slip it. Previously, you had to adjust the audio clip loop points. Secondly, you can hold Shift to stretch or shrink the audio in a region, again, using Command to let it slip. (3) Thirdly, fades are now automatically displayed on the bounding box of each clip in the arrangement view. Lastly, you can reverse a clip by selecting it and pressing ‘R’. Previously, you could only drag ’n’ drop your arrangement into place like Duplo blocks; now it has more of a Technics Lego versatility to it.
Automation workflow has been improved too, with the ability to double click anywhere in a region to create a breakpoint in that particular spot. No more clicking on a line then dragging it into position; simply double click where you want it to go. While there’s more detail to the arrangement view, some will notice the automation lanes aren’t automatically visible. You now have to press ‘A’ to display it. Also, rather than showing or hiding automation lanes for specific tracks, there’s now a global button (next to the Lock Envelopes button) to show or hide all automation lanes for the arrangement. I’d expect some users to dislike the idea of globally displaying automation lanes. Others will appreciate the ability to immediately declutter the entire arrangement view.
NEED TO KNOW


MIDI EDITING & GROUPS
The arrangement view isn’t the only one getting some love, the next two enhancements apply to the session view as well. (4) The quick one is that you can nest groups within groups, so you can really tidy up a performance structure, and create broader mix groups without re-routing.
(5) A big doozy is the ability to edit multiple MIDI clips in one window. No more going back and forth to figure out whether the bass line is in the same key as your chords, or why that rhythm just isn’t lining up with your groove properly. Just highlight one or more MIDI tracks and start tweaking. The track you’re currently editing is displayed in its track colour, with the remaining tracks’ notes greyed out. Simply rollover any note outside of your current track and it will light up the entire track in its own colour, helping you to figure out which part you want to mess with next. If you’re finding it hard to click on a track because the notes overlap, there are coloured bars at the top of the page which allow you to change the working track.


Ableton has always hedged when it comes to delivering full polyphonic aftertouch support, let alone MPE, presumably because it wasn’t seen as a big enough market to warrant developmental attention. However, with a proliferation of affordable and playable MPE devices, like ROLI’s Lightpad Blocks and Seaboards on the market, it does seem like it’s time Ableton fully supported it. Once again, there’s no MPE support in Live 10, you have to resort to setting up individual voice tracks and sending it to a host. It’s laborious, and almost impossible to edit the notes as they’re randomly spread across your (often up to 16) voice tracks. Multiple MIDI clip editing does make it slightly less painful, as you can now select up to eight MIDI tracks to simultaneously edit, but we’re still in the realm of kidneys bursting versus heart attack.

CAPTURE… EVERYTHING
(6) If any other piece of software was monitoring your activity 24/7, you’d get in a privacy fit. Likewise, letting someone hear you in mid-writing flow — as you mumble and stumble through the ideas in your head — can be excruciatingly embarrassing. For some reason, letting Live in on those intimate moments seems okay. Whether you like it or not, from version 10, Live’s new Capture system is now listening in to every press of your keyboard or drumpad. Ableton just got super intimate with your creative process.
Capture now constantly records MIDI inputs in the background so long as a track is armed. The idea is, if you’re jamming out a part searching for ideas and land upon a good one, you simply hit the Capture button (looks like a square made up of just the corners), and it will place your last recorded segment into a clip.
It works in both views, but there are a few quirks to be aware of. If you’re starting off in the session view without any other active tracks, then it will create a new clip every time you hit Capture. It will also detect the bpm of your passage and adjust the global tempo. It will keep adjusting the tempo until you add clips to another track. Once you’ve added something else to your arrangement, Capture’s behaviour changes slightly. It will now record everything you play, but automatically loop the last eight bars during playback if it’s a long passage, less if your passage of play was shorter. If you don’t stop clips on a track, it will overdub over the active clip. If you do stop clips, capture will place your last recorded segment in the new clip slot. However, it does sometimes inject random information from previous takes into the start of your clip, but outside the loop points. It’s a little quirky, as sometimes it’s difficult to find where it was getting that information from. Either way, it rarely impacts your flow, as Live puts them outside your playback loop.
In arrangement view, if a section of your arrangement is looping, it will keep overdubbing over your last played section, splitting the clips if you record for only part of the loop and hit Capture. If you’re not looping, it will simply record a long string of MIDI.
It’s a good implementation of an idea that’s been available in some other DAWs for a while now. It will also record while you’re stopped, so that weird squawk or killer riff you just banged out is waiting right there in Live’s buffer. Also, because it’s MIDI only, there’s no real hit to your CPU.

NOW TO THE NEW STUFF
We’re probably on soft synth overload by now, but hey, no one’s going to turn their nose up at a new synth. (7) ‘Wavetable’ is a… well, wavetable synth.
It’s a dual-oscillator, eight-voice wavetable synth, with 11 built-in wavetable categories from basic to harmonic, formant, noise, and more, with loads of preset waveforms in each. While Serum and others will let you import your own wavetables, there’s currently no way to use your own in Wavetable. Still, there’s plenty to choose from, they’re all anti-aliased, and they all sound good.
Ableton has really nailed the GUI, putting some of its legacy synths to shame. Wavetable synths typically require a more elaborate graphic interface than synths based on simpler waveforms, so while Wavetable fits neatly into the Device View, you can also expand it into the main window to see all the controls at once. It also has a level of graphic detail previously unseen on an Ableton device.
The wavetables appear in scope-like layouts, with a yellow line showing the current waveform. Other than sliding up and down the preset wavetable to find your sound, transposing and detuning it, you can also alter the waveform with FM modulation, pulse width modulation and sync, or warp and fold it.
As well as the two wavetables, there’s a sub oscillator that can be played in unison, or transposed one or two octaves down. Its level and tone can also be adjusted to go from a basic sine sub tone to taking on the character of the patch.
Any new synth in Live automatically benefits from Ableton’s standard set of features like the six 8-voice unison modes, and classic filter designs from Korg MS-20 to OSCar-styles. Wavetable has dual stage filters with all of the usual Live filter suspects. You can control frequency, resonance, shape and slope, as well as combine them in serial, parallel or split modes.
There are also two assignable LFOs, with five basic shapes and the ability to adjust the rate, amplitude, shape and phase. Two assignable envelope filters accompany the amplitude envelope, all of which can be assigned in the modulation matrix.
Wavetable is a hugely useful addition to Live. Those who’ve already invested a lot of time into VIs like Massive or Serum might not immediately need Wavetable, or appreciate its simplicity. For others who’ve been avoiding wavetable synthesis, the curated waveforms, modelled filters, simple LFOs and visual feedback of Ableton’s version makes it one of the easiest to get your head around and to get sounding good.
EFFECTS
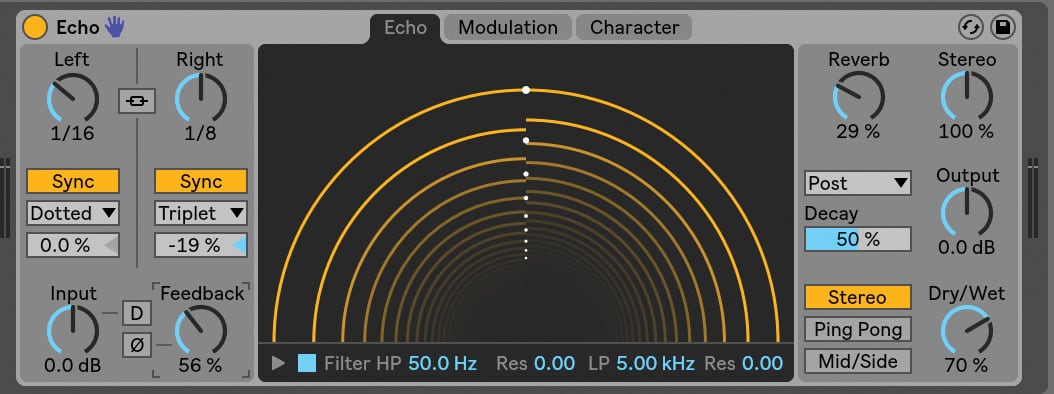
Ableton debuted three new effects along with Wavetable. (8) Echo is a fully-fledged modulated stereo delay with editable character and a ‘ripple’ GUI for adjusting repeats. You can also drive the input, and the lo- and hi-pass filter section allows you to really sculpt the flavour of the unit from clean to dark and saturated. It’s a very flexible delay that also lets you choose between hearing the pitch effects of changing the delay time or not.
(9) Drum Buss puts all your drum tweaking into one plug-in. It’s a distortion/harmonics device, paired with compression, transient shaping and sub boom, with a dry/wet mix control for parallel processing. The sub section lets you tune by frequency or snap it to the nearest note, it also has a cue option to hear just the sub sound.
(10) Pedal is less fancy, but adds three more, usable distortion flavours to your Live rig. The three flavours of overdrive, distortion and fuzz are more versatile than the current Overdrive plug-in, and it sounds great on direct guitar as well as other sources. It also has a three-band EQ with switchable mid frequency for easy tonal sculpting.
All three effects are standouts. However, out of all these new bits of gear, you only get Drum Buss when you buy the Standard version. Wavetable, Echo and Pedal are exclusive to Suite, which makes the extra $100 upgrade cost worthwhile. Also, while Capture applies to all versions, including Intro, only Suite comes with Max for Live, which is now built-in.


WHAT’S MISSING
I haven’t gone over all the new Push integrations, but I will follow that up in a separate review. Likewise, Max for Live is now integrated directly into Live, without the need to boot it up mid-session. It also supports multi-channel audio, SysEx data, and the drum synths have been tweaked. For now I’ve concentrated on elements that are native to the Live software, and what you can expect when you upgrade.
I still have a gripe with the lack of MPE support, but I can let that go. With all the enhancements to audio manipulation in the arrangement view, I’d like to see some implementation of a comp lane system. I know you can loop and spread it across multiple tracks, but like the MPE workaround, it’s just not fun. And that’s what I love about making music in Ableton, it’s fun. The new gear and workflow has only made it moreso.
After playing with the beta for a couple of months, Ableton Live 10 seems worth the upgrade, especially for Suite users. Wavetable is gorgeous, the workflow enhancements are welcome, and Drum Buss and Echo will surely duke it out with Glue for the title of most used plug-in.






RESPONSES