PC Audio
DDMF PluginDoctor exposes all the engine room secrets of your plug-ins. Revealing a few charlatans along the way.
People quite rightly say that you should mix with your ears and not your eyes, yet I’m still a firm believer that understanding some of the processes and limitations involved can help you extract the best from them. I’ve installed and reviewed hundreds of software plug-ins since I wrote a PC Audio column for the very first AT magazine (way back in 1997), and have learned a huge amount about them along the way. However, sometimes a new product gets released that opens new doors of perception, and for me that’s exactly what happened when I purchased the bargain-priced DDMF PluginDoctor (https://ddmf.eu/plugindoctor/). This standalone utility comes with both 64-bit and 32-bit versions (so you can explore both new and old VST plug-ins), and provides a suite of tests that can help you understand how an individual plug-in works, compare those results with other similar plug-ins, and you can even use it to test external audio hardware, connected via your audio interface.
PluginDoctor is a great utility that with practice will help you learn more about what exactly makes your favourite plug-ins sound so good, yet is also sufficiently sophisticated to help plug-in creators during the development phase. Apart from a learning tool, I also use it to quickly evaluate demos of new products before making a purchasing decision (for instance, is that exciter plug-in really adding upper-end harmonics, or is it simply a high shelving EQ, or is that analogue emulation really modelling low-level harmonic contributions, or is it just adding some hiss?).
KEEPING TABS
The main PluginDoctor window shows all the test results, is helpfully re-sizeable, and has six main function tabs across the top – LinearAnalysis, HarmonicAnalysis, Hammerstein, Oscilloscope, Dynamics, and Performance. LinearAnalysis essentially maps out frequency response, displaying by default a range of levels from +10dB to -10dB over the entire audio frequency range, although you can change this anywhere between ±5dB and ±40dB via the Settings window, and also click/drag part of the display to zoom in on smaller details, and switch between multiple sample rates at any time to check (for instance) how the EQ top end extends (or not) when using 96kHz and beyond. I’ve used LinearAnalysis to explore and compare not only the shelving and bell curves offered by various EQ plug-ins, but also the slopes and shapes of their HPF and LPF responses, which can teach you a lot about why some seem more effective or sound ‘nicer’ than others. You can also switch from Freq to Phase response, which may be the key to understanding why some ‘air’ EQs sound better than others, and explore the difference between minimum phase and linear phase designs. Easily missed (but essential once spotted) is the ‘Store’ button at the top left of the main display area. You can save multiple EQ curve plots and then load in a completely different plug-in to directly compare their frequency/phase responses – I’ve used this extensively to match the curves of one EQ to another (why buy another plug-in if you can match it with one you already own?).
HARMONICALLY RELATED
The HarmonicAnalysis tab displays Total Harmonic Distortion or Intermodulation Distortion across the frequency range for your chosen spot test frequency (once again adjusted via the separate Settings window), and is for exploring the non-linearities found in character plug-ins offering analogue-like ‘mojos’ of various sorts, such as transistors, valves, transformers, consoles and the like. The results can be surprisingly informative, as some of the more realistic recreations can turn out to be surprisingly subtle, while quite a few plug-ins exaggerate hardware effects to make them more obvious to the novice. Seeing the levels of each harmonic at different test frequencies can help you decide whether or not a particular plug-in is suitable for mix bus duties, or whether it’s more suited to special effects on individual tracks. It also helps you establish whether or not a digital plug-in suffers from any ‘aliasing’ problems that can make them sound harsh and unmusical. Later releases have added a Sweep frequency test option so you can see how distortion varies over the audible range – perfect for seeing if those transformer emulations really do offer low-end heft, or if those boutique preamp plug-ins really capture the flavour of the original hardware. While in Sweep mode the Fundamental option plots the frequency response of those plug-ins with dynamic variations (which can baffle the more straightforward LinearAnalysis test).
WAVES & ENVELOPES
The Oscilloscope function will already be familiar to most musicians, letting you view the test sinewave at the output of your plug-in to examine how it’s changed in shape, run into clipping, and so on. Watching the waveform change as you alter plug-in parameters such as Drive can also teach you an awful lot about their design and how best to use them. Dynamics is the perfect tab for exploring the action of compressors, expanders, limiters, and saturation plug-ins. Its Ramp display of input level against output level across a 100dB range means you can easily see at what input level compression/expansion starts to kick in as you change the threshold; whether it’s a hard or soft clip, and so on. Meanwhile, its Att/Rel option shows how the audio envelope responds over time, so you can see how much of your transients get through – it’s an educational feast!
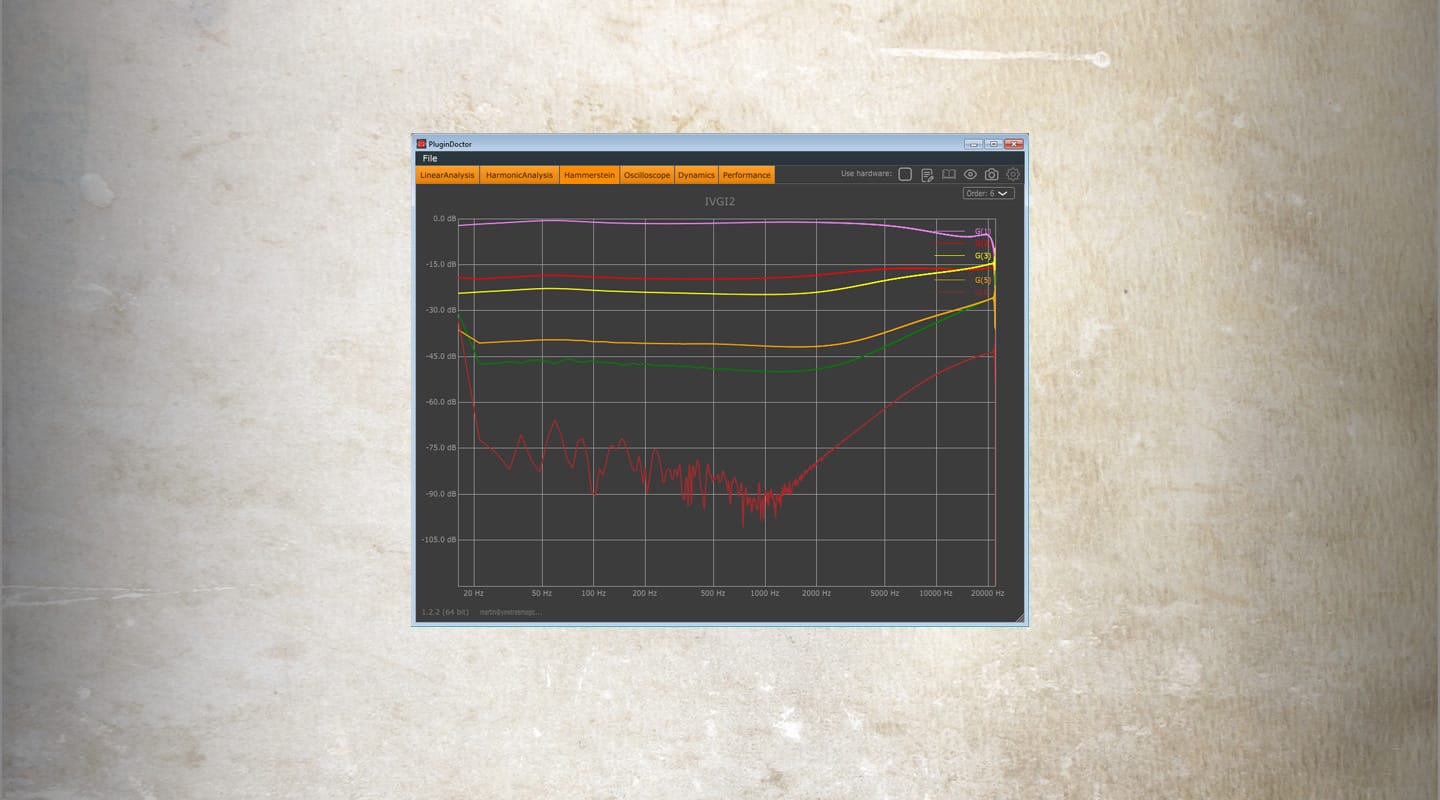
Just a couple of days before I submitted this column, yet another update appeared for PluginDoctor, not only adding more refined options to some existing functions, but also adding a completely new page devoted to Hammerstein analysis, which can simultaneously display the frequency response/level of the first seven harmonics of your test signal – a great way to explore mojo saturation devices in even more detail. This 1.2.2 update also added a Store button to the Dynamics tab, plus very handy Min/Max/Step options that let you zoom in accurately to more closely explore the clipping area of so many plug-ins, which often only occur in the upper 10dB or so of their range.
INTERPRETING RESULTS
It does take a little knowledge to interpret some of the results, so a few beginners have in all good faith rubbished some aspect of a new release because they don’t fully understand how a particular feature functions, although thankfully such mistakes tend to be quickly corrected by more knowledgeable folk. On the other hand, since plug-in developers now know that many users can more closely examine how their products work, they tend to be even more on their toes to avoid releasing new products with bugs, since these are likely to be spotted and exposed on the internet within hours of release. Hopefully, it will also help ensure that marketing departments can no longer get away with exaggerated claims for new plug-ins, as we will be able to measure them for ourselves. Personally, I love PluginDoctor to bits!


RESPONSES