


Review: Ableton Live 8
It’s the program that just... just... just keeps getting better. Loops abound in Live 8, but there’s more to Live than just loops.
19 August 2009
Review: Anthony Touma
The Ableton engineers have done it again. Live 8 is out and about and simply put, it’s great. The new feature set isn’t too over-the-top: it’s well thought out, easy to learn and most importantly, stable. There are several new workflow improvements, a crafty take on groove quantising and some welcome additions to clip warping and management. A few new instruments and effects have been thrown in for good measure and the Operator instrument has been overhauled, making Live 8 more complete than ever. A host of new sounds have also been made available in the new Ableton Suite 8 – Ableton’s flagship version that contains a huge sound library and several virtual instruments. Let’s take a deep breath shall we, and have a look under the bonnet.
INSTALL
The installation process of any software is typically a user’s first point of interaction with his or her new program. Often the ease with which this is achieved can be seen as a window into the minds of the developers: on some occasions it’s a smooth and seamless process, at other times it’s illogical and frustrating. Like the program itself, the Live 8 install procedure is very straightforward. The activation process has been re-vamped somewhat in version 8, making licensing the program easier than ever. Assuming you’re online – and unlike my studio machine, my notebook always is – once the program is installed, Live 8 pings the Ableton website, requesting your serial number, whereupon the program is automatically activated. The Ableton site keeps previous licenses in your profile so there’s no need to keep serial numbers on file yourself. This is a very nice touch. I was also prompted to update to Live 8.0.3 once my install was successful – another aspect of the auto detection software that’s built into Ableton’s website, which again, is a very well thought out and efficient process.
GROOVIN’
Two things that had me pretty excited about Live 8 when I first got wind of its feature list were the new Groove Pool and quantise options. These were the first things I checked out when I loaded the new software and both these features seemed immediately very impressive. Live 8 now allows you to extract a ‘groove’ from any clip, store it in a library, and apply it to any other clip. The ‘groove’ includes not only the quantisation but also the velocity variations detected within a clip. The default library comes with a tonne of grooves ready to go as well, and lovers of classic hardware beat samplers in particular, will collectively rejoice upon discovering grooves from the famed Akai MPC and E-MU SP-1200 drum machines. The really impressive part here is that you can apply grooves seamlessly between audio and MIDI clips alike.
Say, for instance, you were to take a drum clip of a shuffle beat; a right click would extract the groove from the clip and store it in the Groove Pool allowing you to apply it to virtually any other clip in the project, immediately giving these other clips the same shuffle feel. Each groove can also be tweaked accordingly with additional parameters such as timing and randomisation. Additional timing and velocity changes can also be made, with each groove pattern easily opened as a MIDI part and fine-tuned graphically. This worked really well for me when trying to get percussion and drum loops to ‘play nice’, although in some instances I found altering the groove of a sampled loop had a tendency to make things more robotic, something we’re all trying to avoid most of the time. I also found that applying groove patterns to already mastered drum loop samples caused them to sound jagged as their transients and reverb tails were truncated in parts. I should be magnanimous about this, however, as this feature is still very useful and borne out of innovative thinking and a definite step in the right direction.
NEED TO KNOW

The Groove Pool stores groove patterns, including Base Time Signature, Quantise, Timing, Randomisation and Velocity which can be applied to any clip in the project.
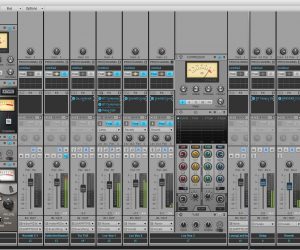
The compressor can be pushed pretty hard before pumping begins to occur and it sounds very rich, providing that really big cooked sound to anything you throw at it.
WARPED
One of the first things I noticed when I opened up Live 8 was the way clips are displayed and auditioned. There’s now a quaint little preview window under the folder list that gives you a visual representation of the clip being auditioned, allowing you to see the sample before importing it into the session window, and you can now skip to any part in the sample while auditioning it. There’s also a ‘raw’ option that allows you to playback the sample in its original time while auditioning it – very cool.
Upon dragging my first clip into a new project, I also noticed the warp and stretch behaviour had also changed; and for me and mine, this is certainly a change for the better. In previous incarnations of the program, a clip was stretched to time by means of the adjustment of timing handles and markers over to respective transients in a clip. This worked well, of course, from a sonic perspective, but the image of the clip itself showed no visible signs of adjustment, remaining static and unchanging in its appearance. Instead, the timeline skewed accordingly over the clip’s image. This was easy enough to get used to but at times it proved confusing; especially with complex polyphonic clips and in instances where radical stretching and warping was required. With Live 8, the clip image itself now warps along fixed timing markers. This means you now get a visual representation of what the clip is up to – whether it’s been sped up or slowed down. This visual feedback makes things much cleaner and far more revealing of your process at a glance. While still on the subject of warping, a new complex ‘pro’ warping algorithm has been made available in Live 8, which provides a very slick sound that has noticeably less artefacts than the standard ‘complex’ option. The CPU consumption is a little higher using this setting: from the tests I did running 10 tracks using the ‘complex’ option across a scene and the ‘complex pro’ algorithm on another, I noticed about 15% CPU usage difference between the two, which is to be expected considering the obvious improvement in sound quality.

Editing a groove pattern is done using MIDI, which makes things straightforward and direct.

Overdrive, Vocoder, Multiband Compressor, and Limiter. A quality set of must have’s without the rack real estate.
FLOW
The workflow improvements in Live 8 are subtle but significant. Firstly, it’s now possible to select multiple tracks and change common channel properties such as volume, soloing, send FX, channel select, record and panning; extremely helpful with live performances in particular. Group channels have also worked their way into the mix so now you can enjoy the routing flexibility afforded to the more established DAW software programs. MIDI tracking has also been improved with marker selections for recording segments within a MIDI part, and the arrangement window also now allowing for non-destructive cross fading between two clips on the same track – very useful. The entire GUI can also be enlarged with a new zoom parameter. This is fantastic for those of you with huge LCD monitors or smaller-sized projects. The unfortunate limitation of this, however, is that the zoom setting is buried in the preferences menu and acts globally, so it can’t be saved as part of the project layout, which would have been nice – a must for future updates in my book.
Third-party plug-in support has also been expanded with a new ‘configure’ button that allows you to open a VST instrument and select the specific parameters you’d like to tweak from the instrument. Parameters are then mapped to the Ableton plug-in window for that particular plug-in. This has vastly improved workflow, given the countless situations where only a small handful of tweaking options are required on a given instrument or effect; very practical and a clever way to keep things clear and direct. It’d be nice if VST developers adopted a similar approach with their own instruments and effects so that unused parameters could be hidden; but I digress…
There are a huge number of presets and templates included in Live 8. Templates are loaded with a simple double-click, just like a preset. Some very practical templates are on offer here and each template loads a particular number of default audio/MIDI channels and a set of preset FX for each channel, depending on your selection. For example, the ‘Analog 4’ channel template loads an instance of EQ, an Optical Compressor and Saturator across four channels, providing an excellent starting point.

Looper is a great little auto-detect and looping sampler with unlimited layering capability. Clips can be dragged straight out of Looper and into the session window.

In previous versions of Live, time stretching a loop was done by moving handle markers over to the desired positions within the loop. The result was an uneven timeline across the top and a static image of the clip being warped.

Warping is now done by changing the image of the clip to fit the fixed timeline. This gives a visual representation of how the clip is being warped and at what point over the timeline.
EFFEX ET AL
There are several new effects introduced into Live 8 and all are welcome additions to the fold. When you load the program for the first time, the demo track quickly draws your attention to the granddaddy of these, the Multiband Dynamics processor. This is a very sexy three-band maximiser that offers intuitive controls, responsive and accurate displays and a cool graphical means of altering ratios. The compressor can be pushed pretty hard before pumping begins to occur and it sounds very rich, providing that really big cooked sound to anything you throw at it. This is something Live users far and wide will be rejoicing in. Not only does it essentially allow them to ‘master’ on-the-fly while they perform, it makes clipping the main output bus a thing of the past. To ice the cake further, a very nice sounding brick-wall limiter plug-in has also been thrown in for good measure, which is extremely simple to use. Running out of things to ask for in one application? Wait… there’s a lot more.
The Vocoder. Typical of Ableton, the new Vocoder is approached from a refreshing and creative angle. Here you’re presented with a harmonic spectrum window laid out in a bar graph, which can be drawn on to suit your sound sculpting needs. There are attack, release, depth, formant and wet/dry controls on board, as well as left/right routing options. The Vocoder itself sounds really cool, allowing you to get that nice metallic sound, which I found especially handy on drums and trippy loops. It wasn’t the hottest thing on the planet for some vocals, but it’s still very usable. A word of warning with the Vocoder: there’s a potential to blow your speakers when experimenting with this effect, so I’d suggest sticking the new limiter in the chain to avoid any calamitous side-effects.
Frequency Shifter and Overdrive. A straightforward ring modulator and flanger has been added to Live 8 too. No surprises here in terms of the controls – they’re all fairly standard – but the same great Live 8 qualities apply to this plug-in as well. The Overdrive plug-in meanwhile is essentially a stomp box emulator, which is delightful for adding distortion and character to boring or thin sounds. It’s also very handy when combined with the new ‘Looper’ instrument…
Looper. This is a very clever sampler which allows you to record, loop and overdub on-the-fly. By playing and recording a phrase into Looper, the plug-in detects its timing and as you finish your riff, the recorded part begins looping in time. Targeted toward guitar players in particular, Looper can be controlled via a MIDI footswitch with simple click-on/click-off facility to record/end and overdub. Users of Reason will be well aware that a similar type of loop recording has existed in that program for some time, but the immediacy and simplicity of Live 8’s new Looper definitely stands out. The auto-tempo detection and overdubbing is too easy (and pretty damn spot on). Additionally, clips recorded in Looper can be dragged directly into the session window for further effecting and manipulation, which makes this toy very playful and immensely powerful.
Collision is an interesting instrument/synth-style effect that’s designed specifically for the emulation and manipulation of mallets via physical modelling. I was a little confused by this initially, intuiting that the use of mallets wouldn’t be something I’d utilise on a regular basis, but after just a few minutes of tweaking and twiddling I soon realised where the power in Collision lies. Creating poignant transients that flow into moving pads is the name of the game here, and if you’re into crafting your own soundscapes and dreamy sequences, Collision will serve you well.
Operator. This big synth has been given the Albeton once-over with a range of new features included to provide additional functionality. There are new (and much needed) filtering options for each oscillator and each oscillator can now have its harmonic attributes edited graphically in the same way as the Vocoder, making it even more elaborate as an all-in-one synth.
There’s also a huge selection of sounds, one-hit samples, loops and instruments included in Ableton Suite 8. The instrument rack has been completely re-worked with extra presets, though this shouldn’t cause any issues for Live 7 projects. The Live 8 instruments are truly inspiring, and organised in a much neater and logical fashion. Everything from orchestral sounds to the new Latin percussion soundset (which is superb) is just a single click away. The Latin percussion sounds have a really smooth tone to them and would fit perfectly into just about any electronic genre. There’s everything from marimbas to congas and all of the sounds are full-bodied and bright, with natural tails that keep things sounding realistic.
USE ME
After using Live 8 extensively, I can confidently attest to its stability. Running it on a Dell XPS notebook, the program runs without a hitch and never feels bloated or sluggish. The new features have been incorporated seamlessly into the program and I doff my hat to the Ableton programmers for their efforts in this regard. The new plug-ins – the Multiband Compressor and limiter, in particular – never become resource hogs yet still deliver the goods consistently over a wide variety of sonic contexts. In terms of value for money, Ableton is certainly shaping up to be quite the workhorse. It’s a serious studio application and live tool in one and it just keeps getting better.


RESPONSES