

Review: Millennia Origin STT-1
Prepare yourself for a deep dive into Millennia’s perennial Origin STT-1, and why the channel strip is as relevant now as it was when released.
12 February 2025
Review: Jonathan Burnside
I met up with the folks from Millennia Media at the NAMM convention in Anaheim earlier this year (2024) to talk with them about reviewing a piece of their gear for AudioTechnology. I use the NSEQ-4 on many of my masters and I’ve wanted to play with more of their units. They suggested I review the STT-1 Origin Recording System which sounded good to me. I’ve spent years owning and producing in recording studios but had never put a ‘channel strip’-type box through its paces. They’re heavily in use in home and production studios, so I was interested in how their workflow compares with recording single tracks in a full recording studio.
Perusing the STT-1’s manual, I found it contains several uncompromised versions of their standalone boxes, as well as two twin topology paths, ie. selectable solid-state or tube amplifiers for both the preamp and the equaliser/compression sections. It also has extras like a selectable transformer and de-esser, both unique to this unit in the Millennia lineup. The Millennia website said that there are 128 possible combinations in its paths. Putting all this into use and then writing about it was going to take some time. Luckily, the editor of AudioTechnology is a paragon of patience and Millennia didn’t seem too concerned when I kept the unit they sent me for four months.
I’ll go through the technicals of the STT-1 from top to tail, share my impressions and check in with Millenia’s designer/founder, John LaGrou.
GEAR TOUR
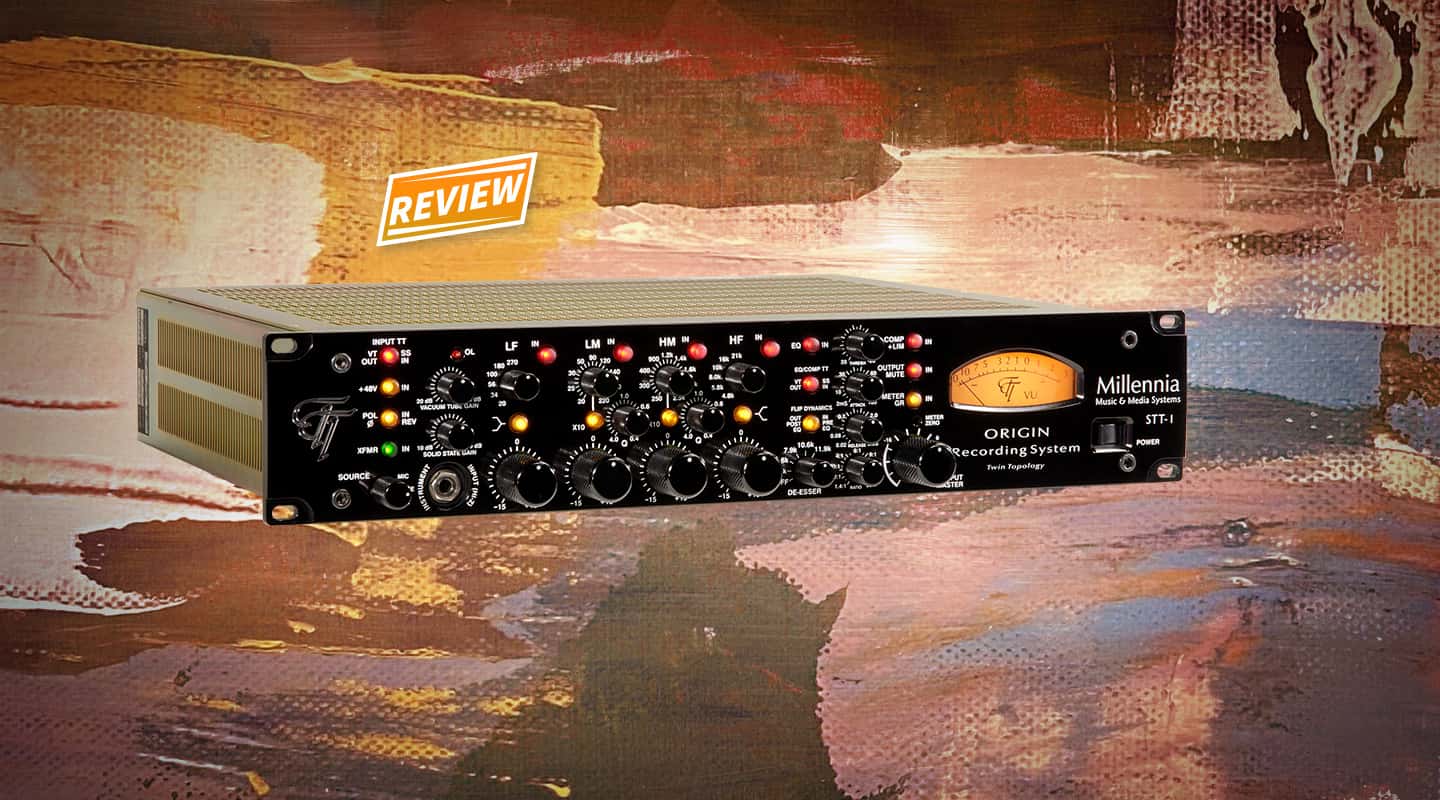
The STT-1 is housed in a mil spec, 16-gauge, cold-rolled steel, 2U chassis. Its 9.5mm thick extruded aluminium, laser-etched faceplate sports a large, backlit moving-coil VU meter, which can be switched to show the level of the main balanced outputs or the amount of the compressor’s gain reduction (but not the de-sser’s gain reduction).
It also accommodates five large knobs, 14 smaller knobs, 18 illuminated IT&T push-button switches and a 1/4-inch direct input for instruments. Above the DI input there is an overload LED which starts to illuminate when the DI output reaches +18dBu and increases in brightness until fully illuminated at +26dBu. The 1/4-inch direct input is buffered with a 12AT7 dual‑triode tube for a very high input impedance of over 1MΩ. All knobs are hand-machined aluminium and I can vouch for their durability, as they are also found on Millennia’s NESEQ-4 stereo equaliser, which I’ve had in trouble-free daily use for several years.
While densely populated, the front panel is logically arranged and was quick and easy to get around on. Happily, there is a power switch at the right hand corner of the faceplate. (Several manufacturers sometimes put their power switches on the rear panel which can be irritating when installed in equipment racks that make them hard to access. Multiple units can share the same power conditioner in a racks, so several units have to be powered up to use one of them. Carbon footprint, power bills and wear are ignored.)
From right to left on the rear panel, there is a balanced XLR microphone input, a balanced XLR line‑level input with a TRS quarter‑inch jack line‑level input below it, a balanced XLR direct output (which is taken before the equaliser and dynamics sections) and an unbalanced XLR main output with an unbalanced 1/4 output below it. Lastly, there is a balanced XLR output with an RCA dynamics link for linking two STT-1s for stereo operation. All the XLRs are Neutrik Galvatronic gold‑plated types. Millennia recommends using gold‑plated connectors on cabling to and from the unit to avoid damaging their conductive surfaces. All tube sockets, relays and switches are also gold-plated.
All outputs can be used simultaneously (handy in a live performance recording when you want to send signal to both the recording system and the sound system). This flexibility also means that a self-engineered performance would never have to be compromised by poorly set equaliser or dynamics settings. Experiment with EQ and compression settings and capture them via the main output, while also capturing the signal solely from the preamp to a second track and you’ve got a good insurance policy.
CHALLENGE TO A DUAL
A unique feature and selling point of the STT-1 is its dual‑topology Class‑A circuitry, which can be switched between solid‑state or vacuum tube active stages with an otherwise identical signal path. This isn’t a gimmick, as can be the case with some units’ switchable features that ultimately give two compromised choices. Both amplifiers operate completely in Class A – the tube path via a pair of triode tubes on a 350V supply rail and the solid‑state path using JFET transistors in a servo‑amplifier configuration on a 50V supply rail.
The difference in sound between the solid‑state and vacuum tube active stages is pronounced and both paths sound great. This choice between the solid state and tube paths provides a lot of flexibility. I often combined them by using one path for the preamp active stage and the other path for the equaliser and compressor, useful for meeting halfway between the two paths’ distinct sounds.
The solid‑state input amplifier is from Millennia’s HV3B microphone preamp, and the tube amplifier is from their M2B mic preamp. There is a difference in the characteristics they produce, with the solid-state amplifier’s clarity and depth of field more pronounced and the tube amplifier sounding a bit fatter and smoother, with slightly rounded transients. As a starting point, I used the preamp’s solid state amplifier, trying to keep transients pronounced because downstream processing sometimes diminishes them. For many vocals and overly bright or screechy guitars, I preferred the sound of the preamp through the tube amplifier.
Having the choice between tube or solid state input amplifier on the line and direct inputs, and the ability to switch the transformer in or out makes the STT-1 a good direct input for recording instruments and re-amp uptake, and for processing recorded tracks via the line input. (I’ll go through through the transformer in my conversation with Millennia capo, John LaGrou).
NEED TO KNOW
Millennia Origin STT-1
Preamp Channel Strip
PREAMP PERSONALITY
The preamp itself has a very straightforward personality, especially when using the solid-state amplifier. On any input, it was my choice when wanting to retain maximum detail and neutrality of the source. When an input’s source needed to sit and glow, I liked the smooth-talking tube amplifier.
In the manual, Millennia reminds the user that phantom power should be off before a microphone is inserted or removed from the mic input as doing so can damage the unit, and this is good to remember when using any preamp with phantom power.
Also of note on the preamp: while ribbon mics sound good plugged directly into it, there is no option for DC-coupled inputs optimised for ribbon mics or separate ribbon-optimised path, as there is on Millennia’s other preamps with the exception of the HV-16 Remote Dante Network Preamp. Not to worry: The phantom-powered Royer dbBooster sounds transparent between a ribbon or dynamic mic and the STT-1, giving the benefits of an optimised ribbon path, with more gain into the mic input. (You can read my review of the Royer dBooster here: https://www.audiotechnology.com/reviews/royer-labs-dbooster).
Overall, I leaned more on the compressor and equaliser section’s tube amplifier than the preamp’s tube amplifier. The optical compressor followed by the tube path was transparent and smooth, with a subtle shine. For tracks that needed EQ shaping for clarity, I chose the solid-state path.
EQUALIZER STROKES
The equalizer is four‑band, with adjustable Q on the two mid bands and switchable shelf frequencies for the lowest and highest bands. The entire EQ section can be bypassed, as well as each of the four sections individually. The low frequency shelf has six selectable shoulder frequencies, from 20 to 270Hz. The low mid band is continuously variable from 20 to 220Hz (or 200Hz to 2.2kHz with the x10 button depressed). The upper mid band is continuously variable from 250Hz to 2.5kHz (or 2.5 to 25kHz). The Q of both mid bands have continuously variable bandwidths from 0.4 (broad) to 4.0 (narrow). The high shelf has six selectable shoulders, from 4.8 to 21 kHz.
This equaliser is what’s found in their Millennia NSEQ-2 and NSEQ-4 stereo equalisers, with the NSEQ-4 having no tube path, lower noise and even more definition. Both of the units are among the most transparent active equalisers out there. Having a parametric EQ of this power in a channel strip is perhaps my favourite feature of the STT-1.
This EQ is not for surgery, with its narrowest Q of 4.0. Instead, it’s punchy, clear and open with an addictive depth of field. Every band is open and neutral. The low and low/mids band can bring a huge, clean punch to the party. I attribute this to the EQ’s neutrality and low distortion, which bring depth of field to an EQ band. A vintage-style EQ with transformers can be a magical pillow of bounce and expansion, aided by inherent harmonic distortion. In terms of anatomy, the STT-1 EQ is muscle tone and a vintage-style equaliser is sexy curves.
The STT-1’s high-frequency shelf is the same as the now-legendary NSEQ-2’s. It’s an effective can-opener for a tinned instrument or mix. Engineers began raving about it, so Millennia packed that band alone into a 500-series unit called the NESQ-HF. While the NESQ-HF has a peak/shelf selector switch, as found on the NSEQ-2 and 4, I seldom use it on those units. Even when needing to boost as low as the 4.8kHz setting, the corresponding opening of the frequencies above is usually a benefit. I love shelf-boosting with the 21kHz setting to add an airy openness and depth to a track, mix or master. I’ve used several EQ’s strictly for this band alone, and Millennia’s version may be my favourite.
A simple and effective way to track with the STT-1 is to use the low shelf and low/mid bands to subtract rumble and low-end resonance, such as the boom from a dreadnought acoustic guitar or the bottom of plosives on a vocal, then open up the top with the 21kHz shelf. The equaliser can be inserted into the chain pre or post the compressor via a front panel switch, so any excess low end that would otherwise trigger compression can be cut before hitting the compressor. I found this easy to dial in when tracking through headphones, and although there are many options on the STT-1, just doing the above with the solid-state preamplifiers selected gave stellar results every time.
Adjusting EQ, compression and the amplifier paths with a few knobs in front of me was easy and more fun than clicking between multiple plugin GUIs or doing the gymnastics stretching across multiple equipment racks

TESTS: FLAT OUT
I spent a few weeks testing the STT-1 using a super-flat DPA 4011 small diaphragm condenser for acoustic instruments and a vintage Neumann Gefell CMV-563a for vocals. Every time I took off the headphones and listened to the recording through ATC-25A midfield monitors, I heard what I had intended while adjusting the STT-1 settings in the cans.
I’m usually judicious when using EQ (or ‘correction’, as it was original called) when tracking. The right microphone placed in optimal position may not need much correction. That said, when tracking myself with the STT-1, I felt relaxed finessing questionable frequency areas on the fly. My vocals have a 2kHz peak that I EQ out while mixing, so I tracked it with STT-1 while dropping that frequency area with the upper mid band. It worked great and was easy with the well-positioned STT-1 at my fingertips.
OPTO COMPRESSION TESTS
The compressor on the STT-1 is an optical compressor, which is a good choice for self-recording because optical detection is forgiving. Because of this, LA2A-type optical compressors for acoustic guitar and vocals have been a standard for some six decades. Unlike an LA2A, this compressor has a lot of flexibility, with full control over threshold, ratio, attack and release. Attack times are from 2 to 100ms and release times are from 20ms to 3s. Ratio is from 1.4:1 and 30:1, so it can act as a limiter.
Shunt‑connected opto‑resistors are used in its design to maintain clarity and musicality, so it’s not a super-fast compressor. This isn’t a problem recording vocals and most instruments. I tracked vocals with a lower threshold and a lower ratio, and was able to gently level out the track, reducing the need for automation while mixing. The results were natural-sounding and never intrusive.
When tracking a vocal that had quiet verses and louder choruses, I used a higher ratio and lower threshold so compression was only activated on the chorus sections in order to better match the loudness of the two sections. It handled this task beautifully, with no obvious compression artifacts on the louder choruses. Using higher ratios, it’s necessary to adjust the attack and release carefully for smooth transitions between lines and the sections, but with the STT-1 within reach, this was easy to do. The results were more natural sounding than when I switched over to an 1176 for the same purpose. When I mixed the song, I only used a little automation to match the vocals to the differing volumes of the backing instruments.
When using this opto compression passively, with no following solid-state or tube amplification, it acts as ‘variable resistors’ to ground and has a ‘straight wire’ transparency. Using the compressor completely passively is possible only when not also using the equaliser, as both share the same amplification path. When I needed both EQ and compression, but wanted to remain as transparent as possible, selecting the solid-state amplifier worked well. When I wanted more of a classic, slightly-coloured vintage-type sound or was using the compressor to smooth spike sources, I selected the tube amplifier.
I don’t always track with compression. Suppressing louder parts as a way to get higher level into a DAW isn’t necessary when recording in higher resolutions. That said, once I dialled in the preamp and EQ paths settings, the STT-1’s compressor added body and presence to vocal tracks and I ended up using it most of the time. It also smoothed out rhythm acoustic guitar performances transparently.

DE-ESSER TESTER
The compression section has a rotary switch that enables the de-esser and selects its five starting frequencies, from 4.9kHz to 12kHz. When the de-esser is enabled, the compressor is disabled and all its knobs control the de-esser parameters. Metering of gain reduction is not possible when in de-esser mode. Because a de-esser is meant to reduce high frequencies, which are the fastest waves, the attack and release times should usually be set fast to catch them. At gentle reduction, the de-essing is broadband, but moves to a narrower Q when using higher ratios for more reduction. There is no side-chain listen switch or gain reduction metering, so I ended up only using the de-esser when testing it. None of the sources I recorded were overly-sibilant, and the little bit of sibilance present weren’t worth sacrificing the use of the compressor to tame. That can be done easily in the mix with a transparent de-esser plugin that offers side-chain listening, metering and graphic representation (for example, I like the Weiss De-esser plugin from Softube).
The STT-1’s de-esser sounded smooth and transparent when suppressing the top frequencies of finger squeak on an acoustic guitar performance and gently attenuating sibilance on a vocal track that would be compressed downstream (I generally prefer to use de-essing after compression, though, because sibilance can overshoot a compressor’s attack time). The de-esser could also come in handy to reduce RF interference during a live performance. It’s a nice feature to have for these scenarios, but I found it to be the feature of the STT-1 that I used the least.
TRANSFORMER HEFT
A more significant feature of the STT-1 is the Millennia MIT-01 audio path transformer, switchable into the front-end circuit via a pushbutton on the left of the faceplate. This is a big footprint transformer and whether it’s engaged or not makes a big difference to a track’s low and low/mid weight. I haven’t heard another transformer circuit that sounds quite like this one. It’s huge, but the low frequencies don’t lose their clarity, which is in line with the transparent Millennia sound found throughout the STT-1.
Millennia is a company popular with audio purists who aim to record classical and jazz musically and clearly, so transformers aren’t found in their other units. Their gear is designed with simple signal paths, high-end components and hand-construction. In practice, I engaged the transformer far less than half the time, because I had no need to alter the sound by adding additional weight to the lows via an inserted transformer. But when I wished the source had more girth down there (ie. funky old ’60s off-brand guitars, vocals recorded with a harmonic mic and changing the ‘bap-bap’ of a snare drum to a ‘pum-pum’), the transformer worked beautifully. The results were more natural than when trying it with EQ.
DON’T DI WONDERING
The STT-1’s direct input, located and switchable on the front panel, gives all of the above mentioned possibilities to the DI path. I like the consistency of active direct boxes (such as the Avalon U5) because their sound is not dependent on a preamplifier, which passive DIs require. For live purposes, an active DI is costly, but it’s great not having to rely on (sometimes) sub-par live sound desk preamps. Having the features mentioned above paired with a high quality DI is why bassists like Bootsy Collins have STT-1s in their rigs. The STT-1 has become a favourite (and expensive) bass DI, and it shines on vintage mono keyboards, like Rhodes or Wurlitzers.
As a DI input for re-amping through stomp boxes and vintage tape echos, the STT-1’s transformer, EQ, compressor and amplifiers can shelve off noise and fizz, remove extraneous flub from the low end and add musical weight to skinny guitar.
STRESS TEST
The STT-1 was designed for pristine recording with a power palette of options, but I thought I’d see how it handled abuse. I ran a previously recorded aggressive vocal performance line-level into the STT-1 and smashed it with the fastest (2ms) attack, low threshold and high ratio while playing with the release time. Despite the ridiculous amount of compression applied, the vocal remained clear, present, more in your face, but still musical. The beginning of some louder, barking lines sometimes overshot the attack time and poked out, but using automation or clip gain to attenuate the opening peaks being sent to the STT-1 was easy.
The brutalised vocal was perfect for the post-punk, quasi-industrial direction I wanted to run with for the song. So I ran its kick, snare and cymbals line out of Pro Tools into the STT-1 and record them back into the DAW, processing them track by track. Even with extreme compression and EQ settings, the resulting tracks remained intact, with a punchier sound than I had been able to getting aiming for the same thing with plugins. The natural, uncompressed drums sounded like a drum machine from hell after STT-1 processing, a sound I had tried for using plugins but felt the punch of each drum was being dampened. STT-1 turned them into the devil’s own Drumulator.
All the powerful choices on the STT-1 come across here. I could enable the transformer when wanting more weight and choose the vibe of the transient shaping by using any combination of the two amplifier paths, while EQing out unwanted gnarly frequencies and boosting punchy ones. Some of the Millenia literature on the STT-1 mentioned that the units that the STT-1 is derived from are better optimised for line levels, which I trust is true in terms of the technically meticulous mission statement of the company. But when processing recorded tracks line-level through the unit, it worked fine and there were no level problems or impedance drag.
TEST REFLECTIONS
Testing and reviewing the STT-1 has been a dive into waters that kept getting deeper. But I found deciding what worked best for each track was quick, as the different choices are pronounced and easy to A/B. Because of that, a big takeaway was how easy it is to engineer a self-recording with a channel strip this powerful. When I record myself, I engineer as little as possible, rather I try to stay in the performance headspace. Trying to reach a preamp in one rack, an EQ in another and a compressor somewhere else, while wearing headphones and having to remember mic proximity after moving around is a vibe killer and even worse when tracking acoustic guitar than vocals. Placing the STT-1 in a rack within reach gave me a plethora of choices which I could adjust from my recording position, and I found playing to a more finessed sound in the cans inspiring.
The ease of operation also held true when processing recorded tracks through the STT-1. Being able to quickly switch through so many possibilities from the same listening position, after routing from a recording to a mix processing setup with a single click of a front panel knob, inspired me to do more premix analogue processing on tracks. Adjusting EQ, compression and the amplifier paths with a few knobs in front of me was easy and more fun than clicking between multiple plugin GUIs or doing the gymnastics stretching across multiple equipment racks. And I liked the results better than when using plugins.
SIGN OFF
I feel nauseous when I think about the thousands of dollars I’ve spent on plugins that I no longer use because technology and design advances bring continuous improvements to newer plugins. Anything computer-based depreciates quicker than a new car driven off a dealer’s lot. This isn’t the case with high-end analogue units as they hold their value. The STT-1’s considerable investment was starting to look more reasonable.
Calling the STT-1 ‘The Origin Recording System’ doesn’t tell its whole story. It’s a high-end studio in a 2U enclosure that excels in recording, as well as mixing. For a recordist who wants top-shelf recordings and powerful mix processing, the STT-1 is an excellent one-stop shop, studio-in-a-box.


RESPONSES